
Asynchronous React Navigation: Taming the Flying Spaghetti Code Monster
Apr 4, 2023

Tómas Pálsson

React navigation
React Navigation is an impressive navigation library that serves as the prime choice for maneuvering between screens in React Native. Boasting built-in support for a wide range of navigators, one of its key strengths lies in its ability to determine the most efficient path between any two screens, no matter how deeply embedded they are within the navigation hierarchy.
There is, however, one area where we believe it falters: transferring data between screens, particularly when sending data back to a previous screen. This becomes even more cumbersome when they advise against passing non-serializable values between screens, compelling us to rely solely on some form of external storage.
Our Example App: The No-Frills Invoice App
To highlight the problems with passing data between screens we will be using an example app that lists invoices and allows users to pay them within the app. It's no beauty queen when it comes to UX design but it gets the job done.
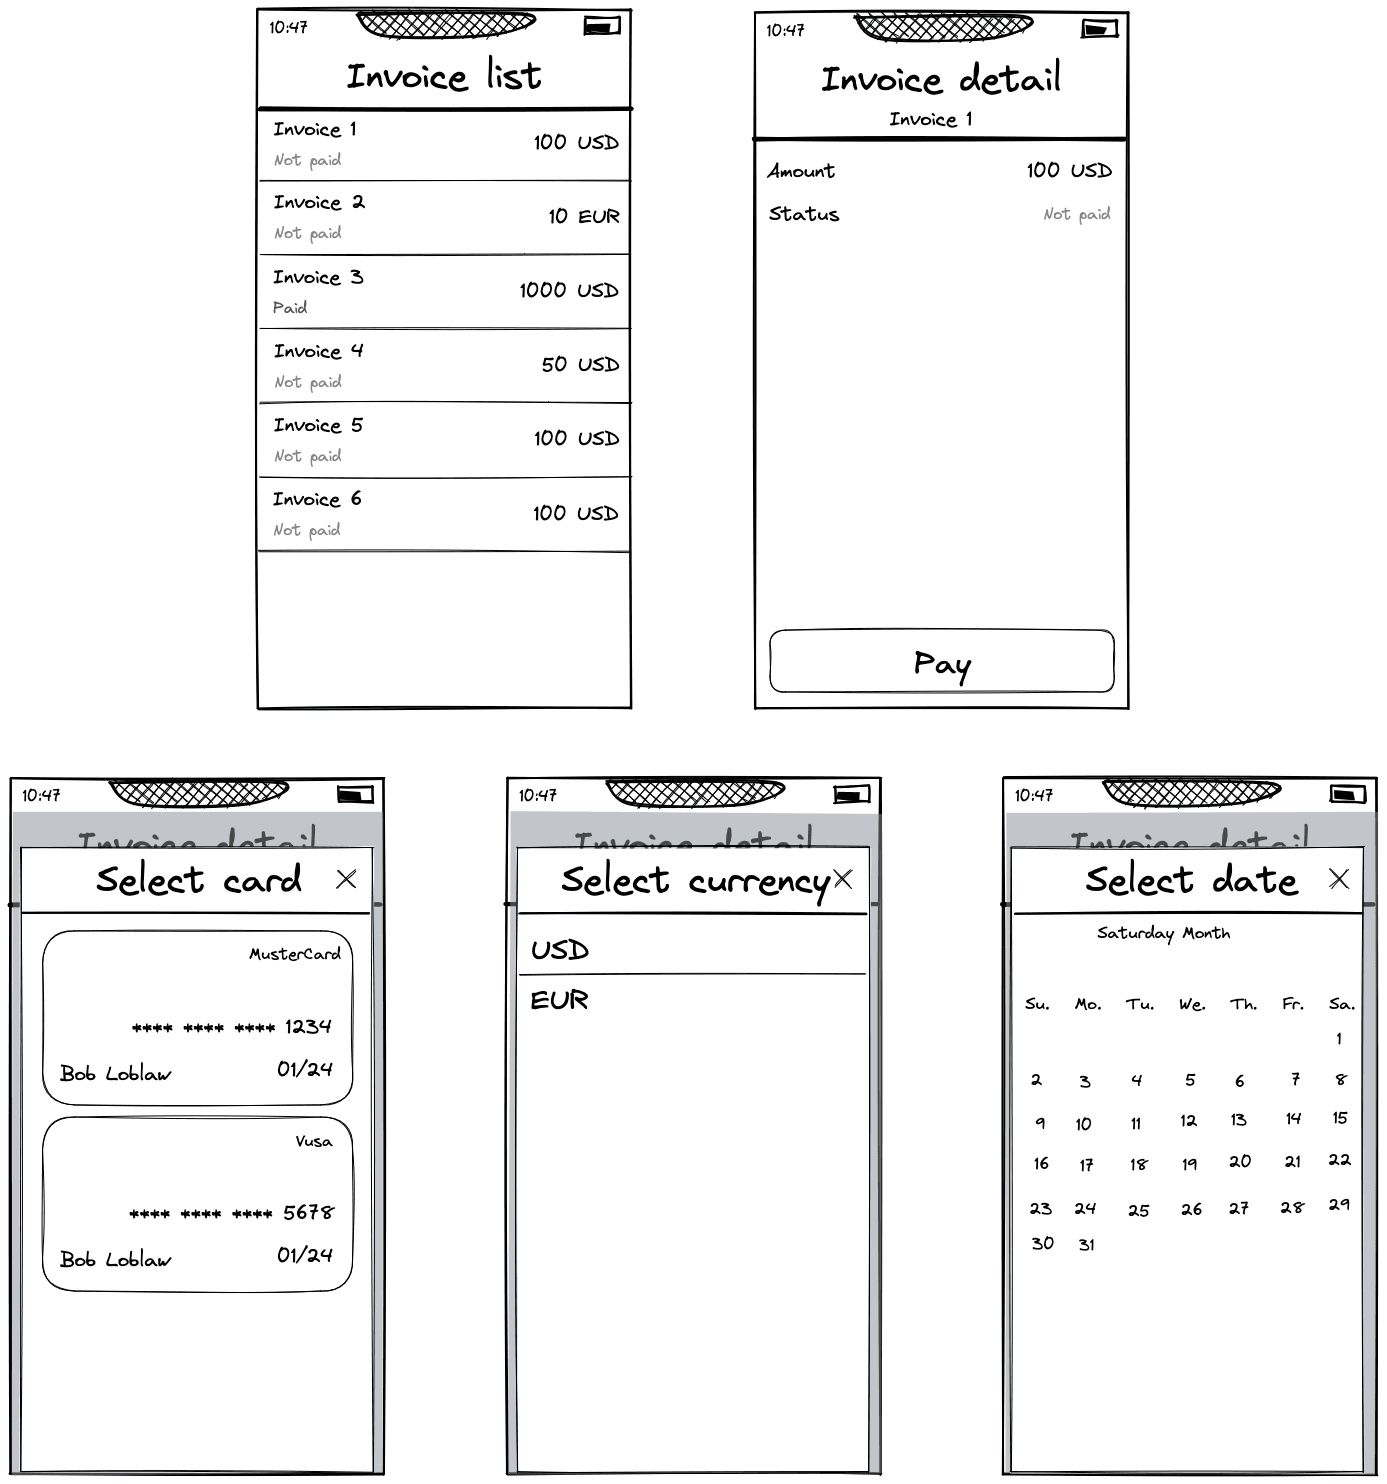
We'll explore the following UX flow:
Choose an invoice from the list
Press pay
Authenticate the user
Select a card for payment
If currencies differ, choose one
If the invoice date is in the future, pick a date between now and then for payment
The standard React Navigation approach
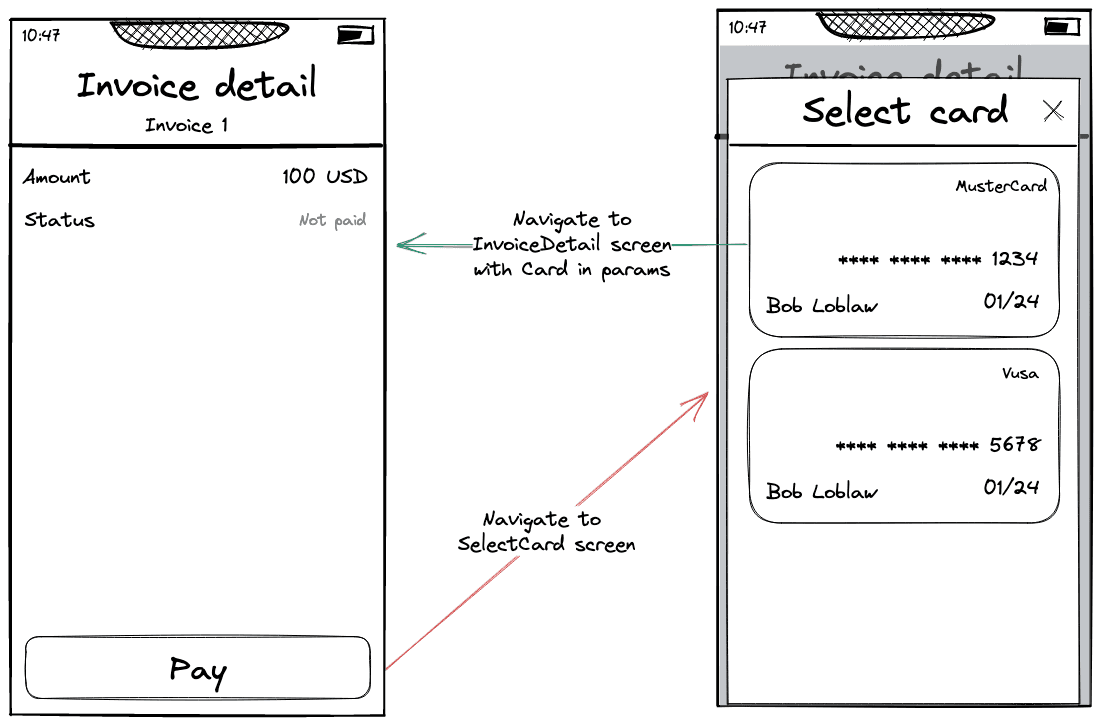
React Navigation's standard approach for passing data back involves navigating back to the screen that initiated the process. This means every screen must know which screens it can navigate back to, which unnecessarily couples code together.
Enter the Spaghetti Code Monster
While this method might seem reasonable for a small app, it quickly turns into a tangled web of dependencies as the app grows, trapping unsuspecting developers in its snare.
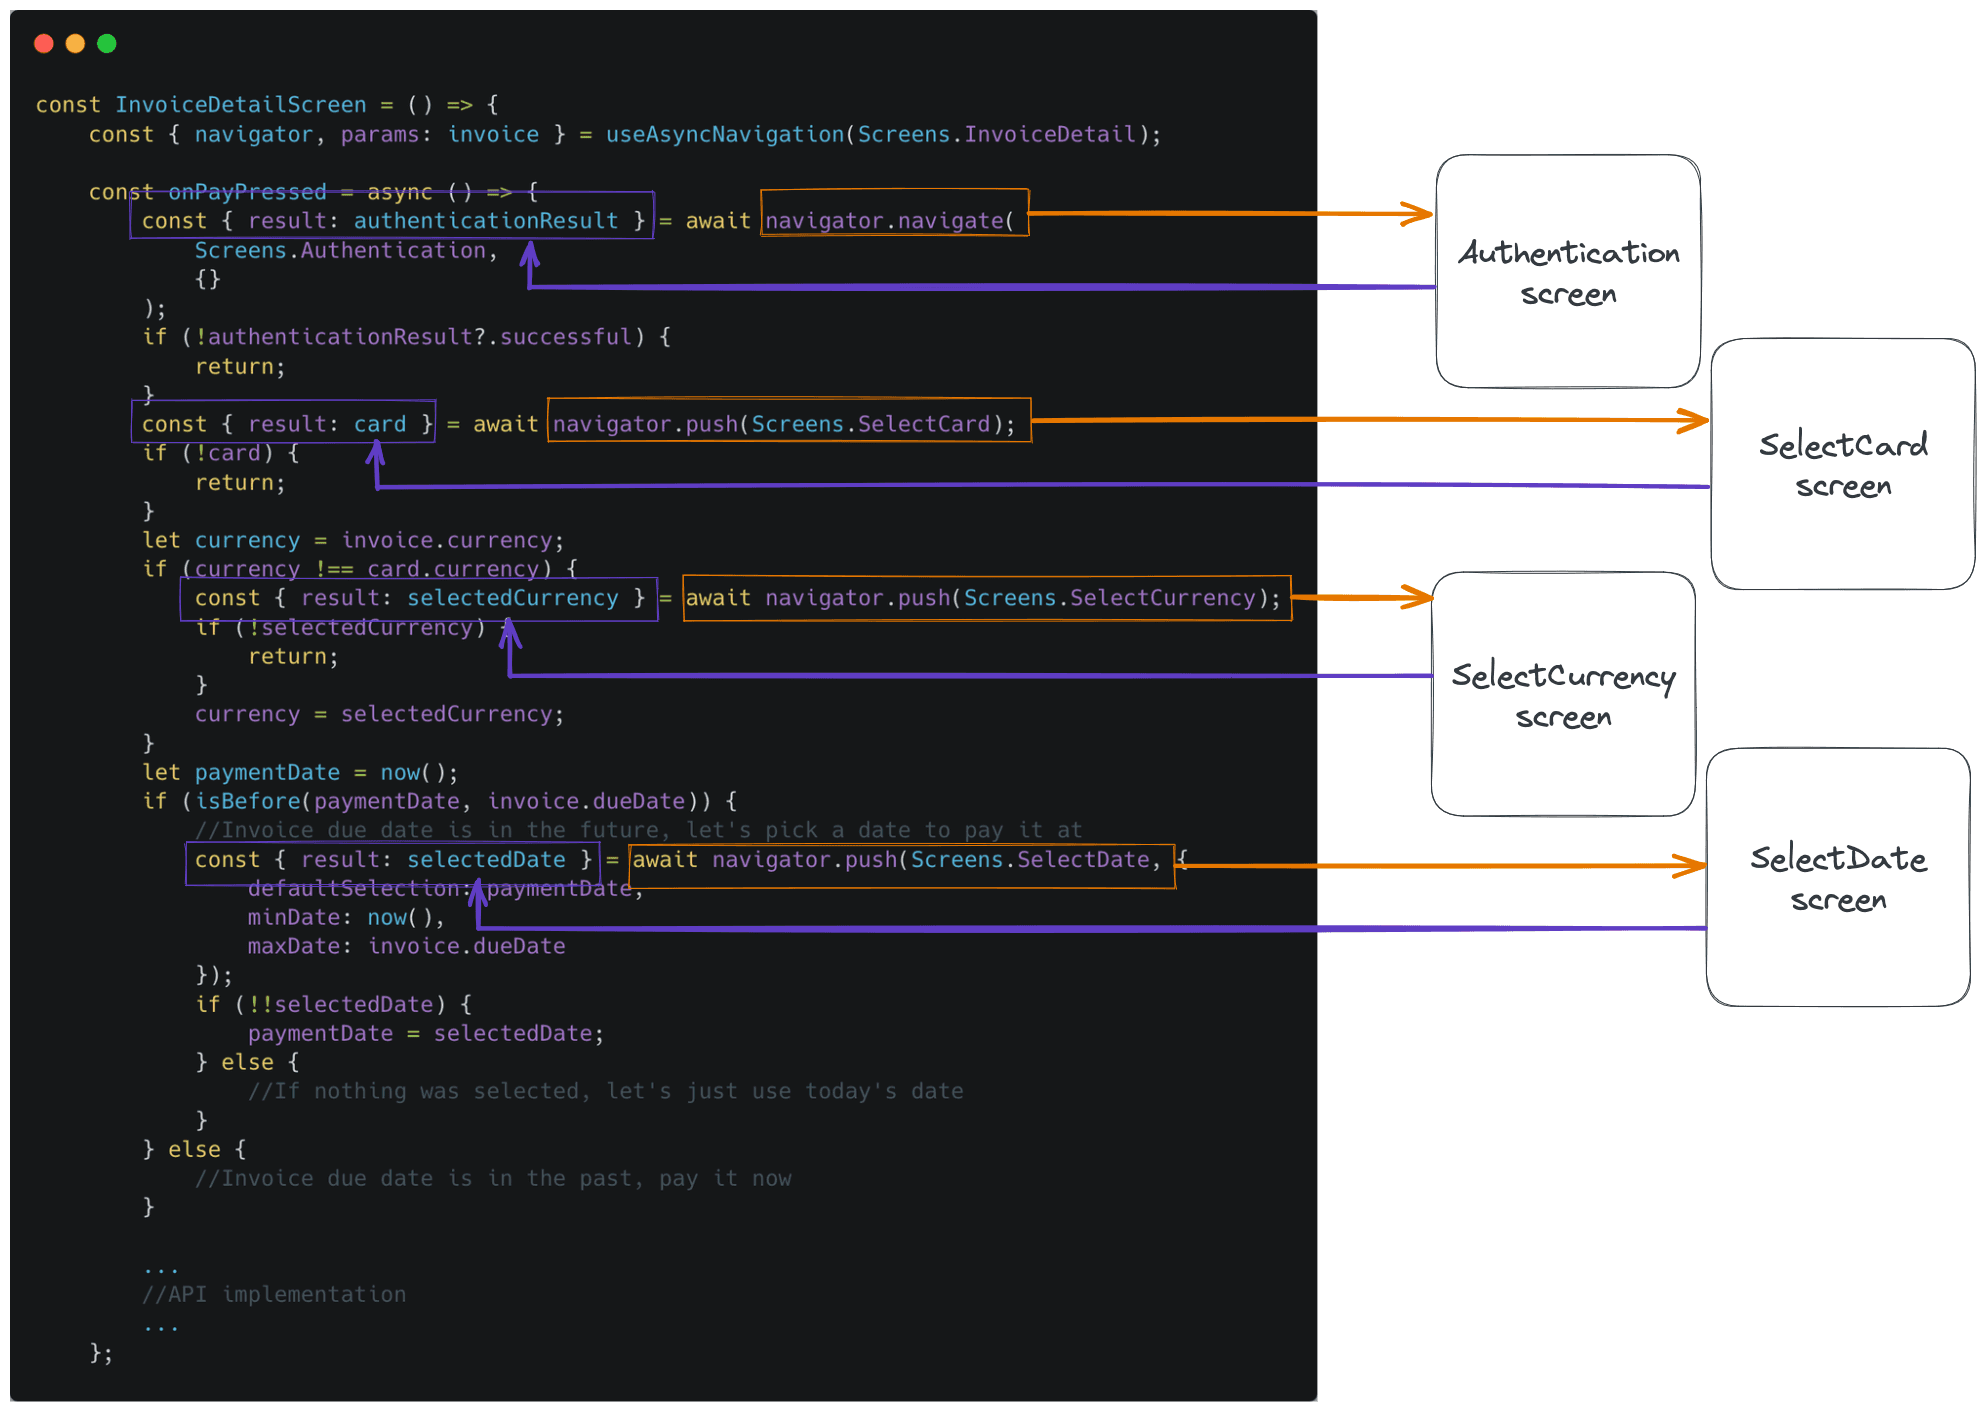
Diving into the InvoiceDetail screen using this approach is like untangling a plate of spaghetti code, with each noodle representing a different piece of the navigation flow. Let's take a closer look at this mess and try not to get sauce on our hands.
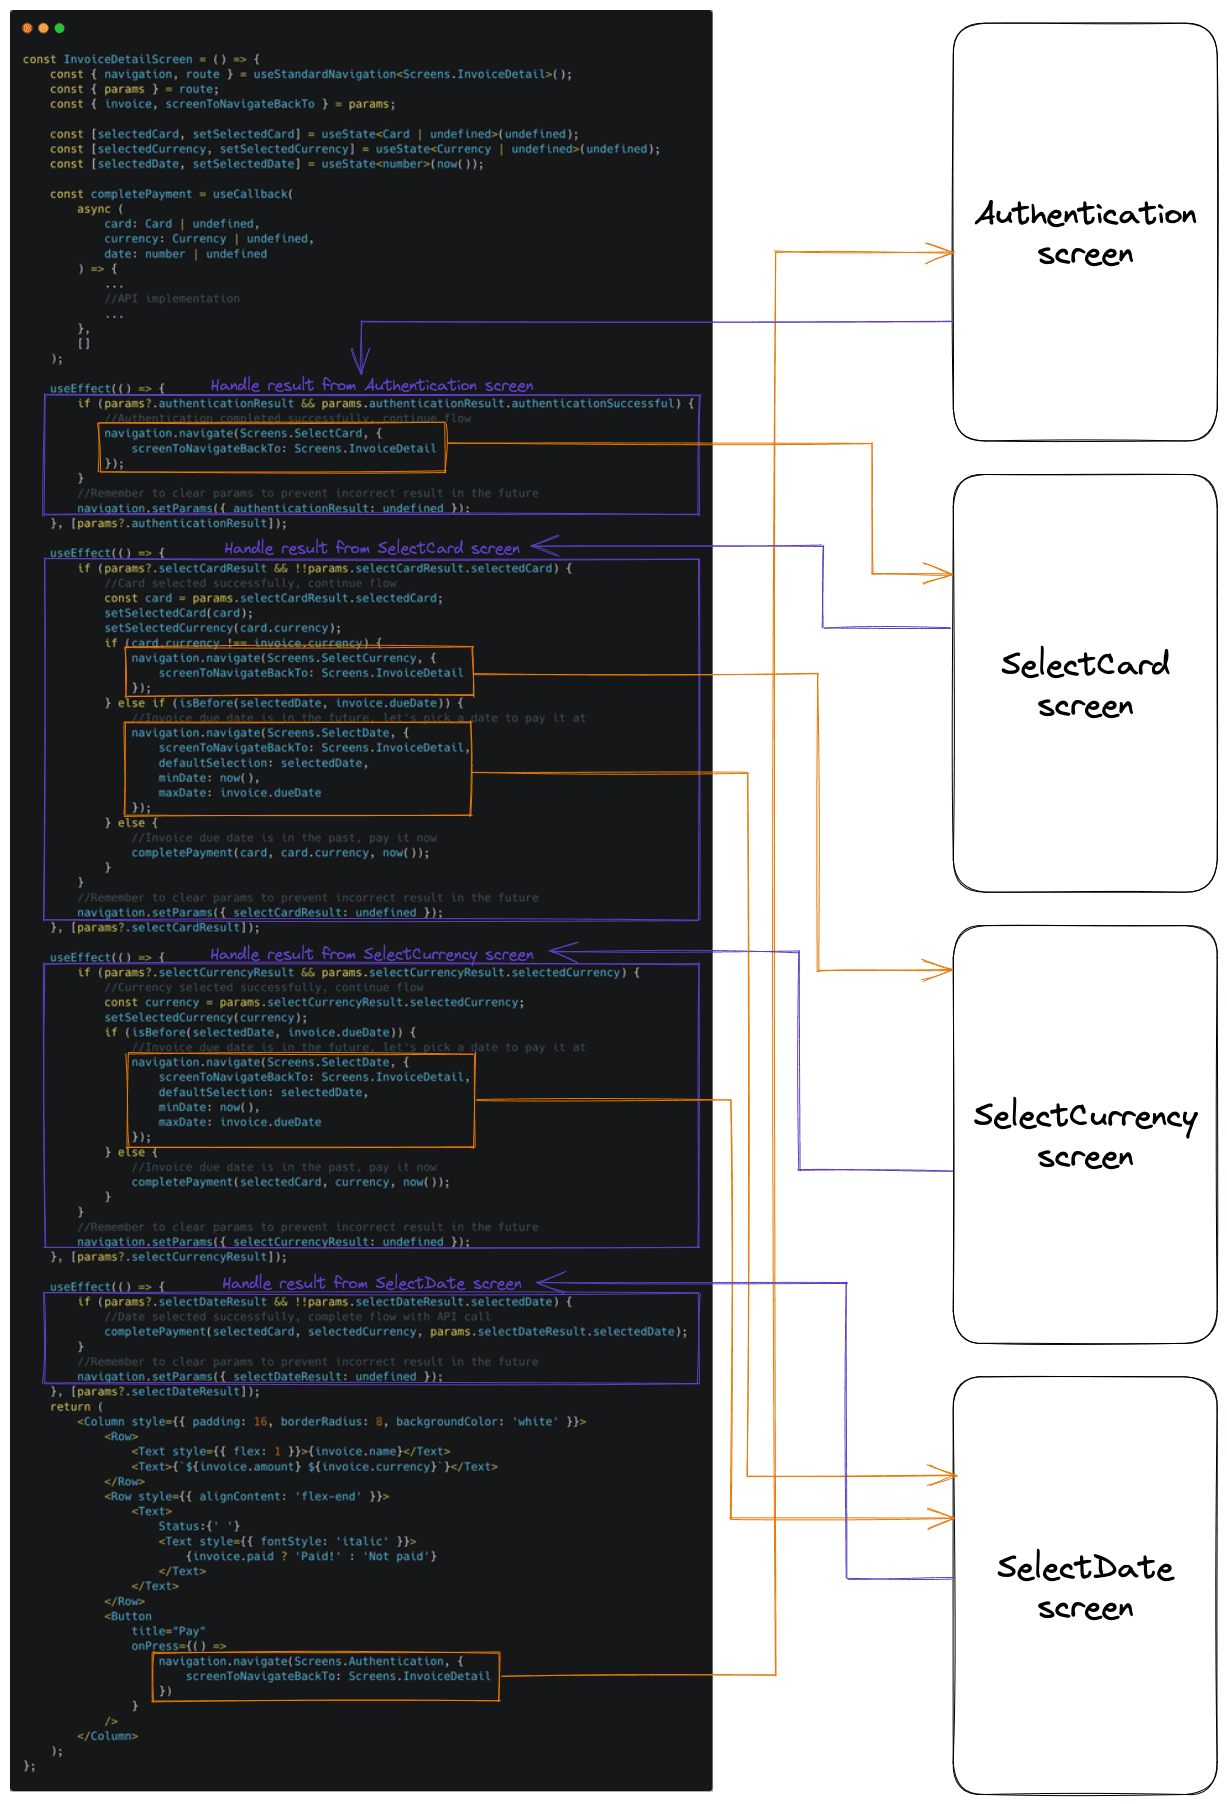
The primary issue is the fragmented flow.
It starts with the onClick function but ends immediately when the authentication screen is shown.
After completing the authentication screen, we resume in a totally different part of the invoice detail screen component with a useEffect block, where we first have to check whether we are coming back from the authentication screen and if so, whether it was successful.
We then need to do a separate useEffect block for each sub-screen which scatters our code like the aftermath of a paper shredder accident, leaving us to painstakingly piece it back together.
In this scenario, we need to store the current state of the payment-action and update it every time we return from a screen. This half-finished action hanging in memory feels unclean and error-prone.
The conditional logic for the currency is also clunky since the default case (when the currency is the same) needs to be in two places: when returning from card selection and currency selection.
We still haven’t covered the worst part of this which is that the sub screens all need to know which screen they should navigate back to. This tight coupling makes screens less composable and complicates future changes to the flow. Picture the screens as LEGO blocks, the UX flow as their arrangement, and this navigation approach as the Kragle that binds them together.

This approach also violates the single responsibility principle: why should the authentication popup care about which screens call it? It should simply authenticate the user and nothing more.
So we know what we don’t want, but what DO we want?
The Cleaner, Leaner Approach
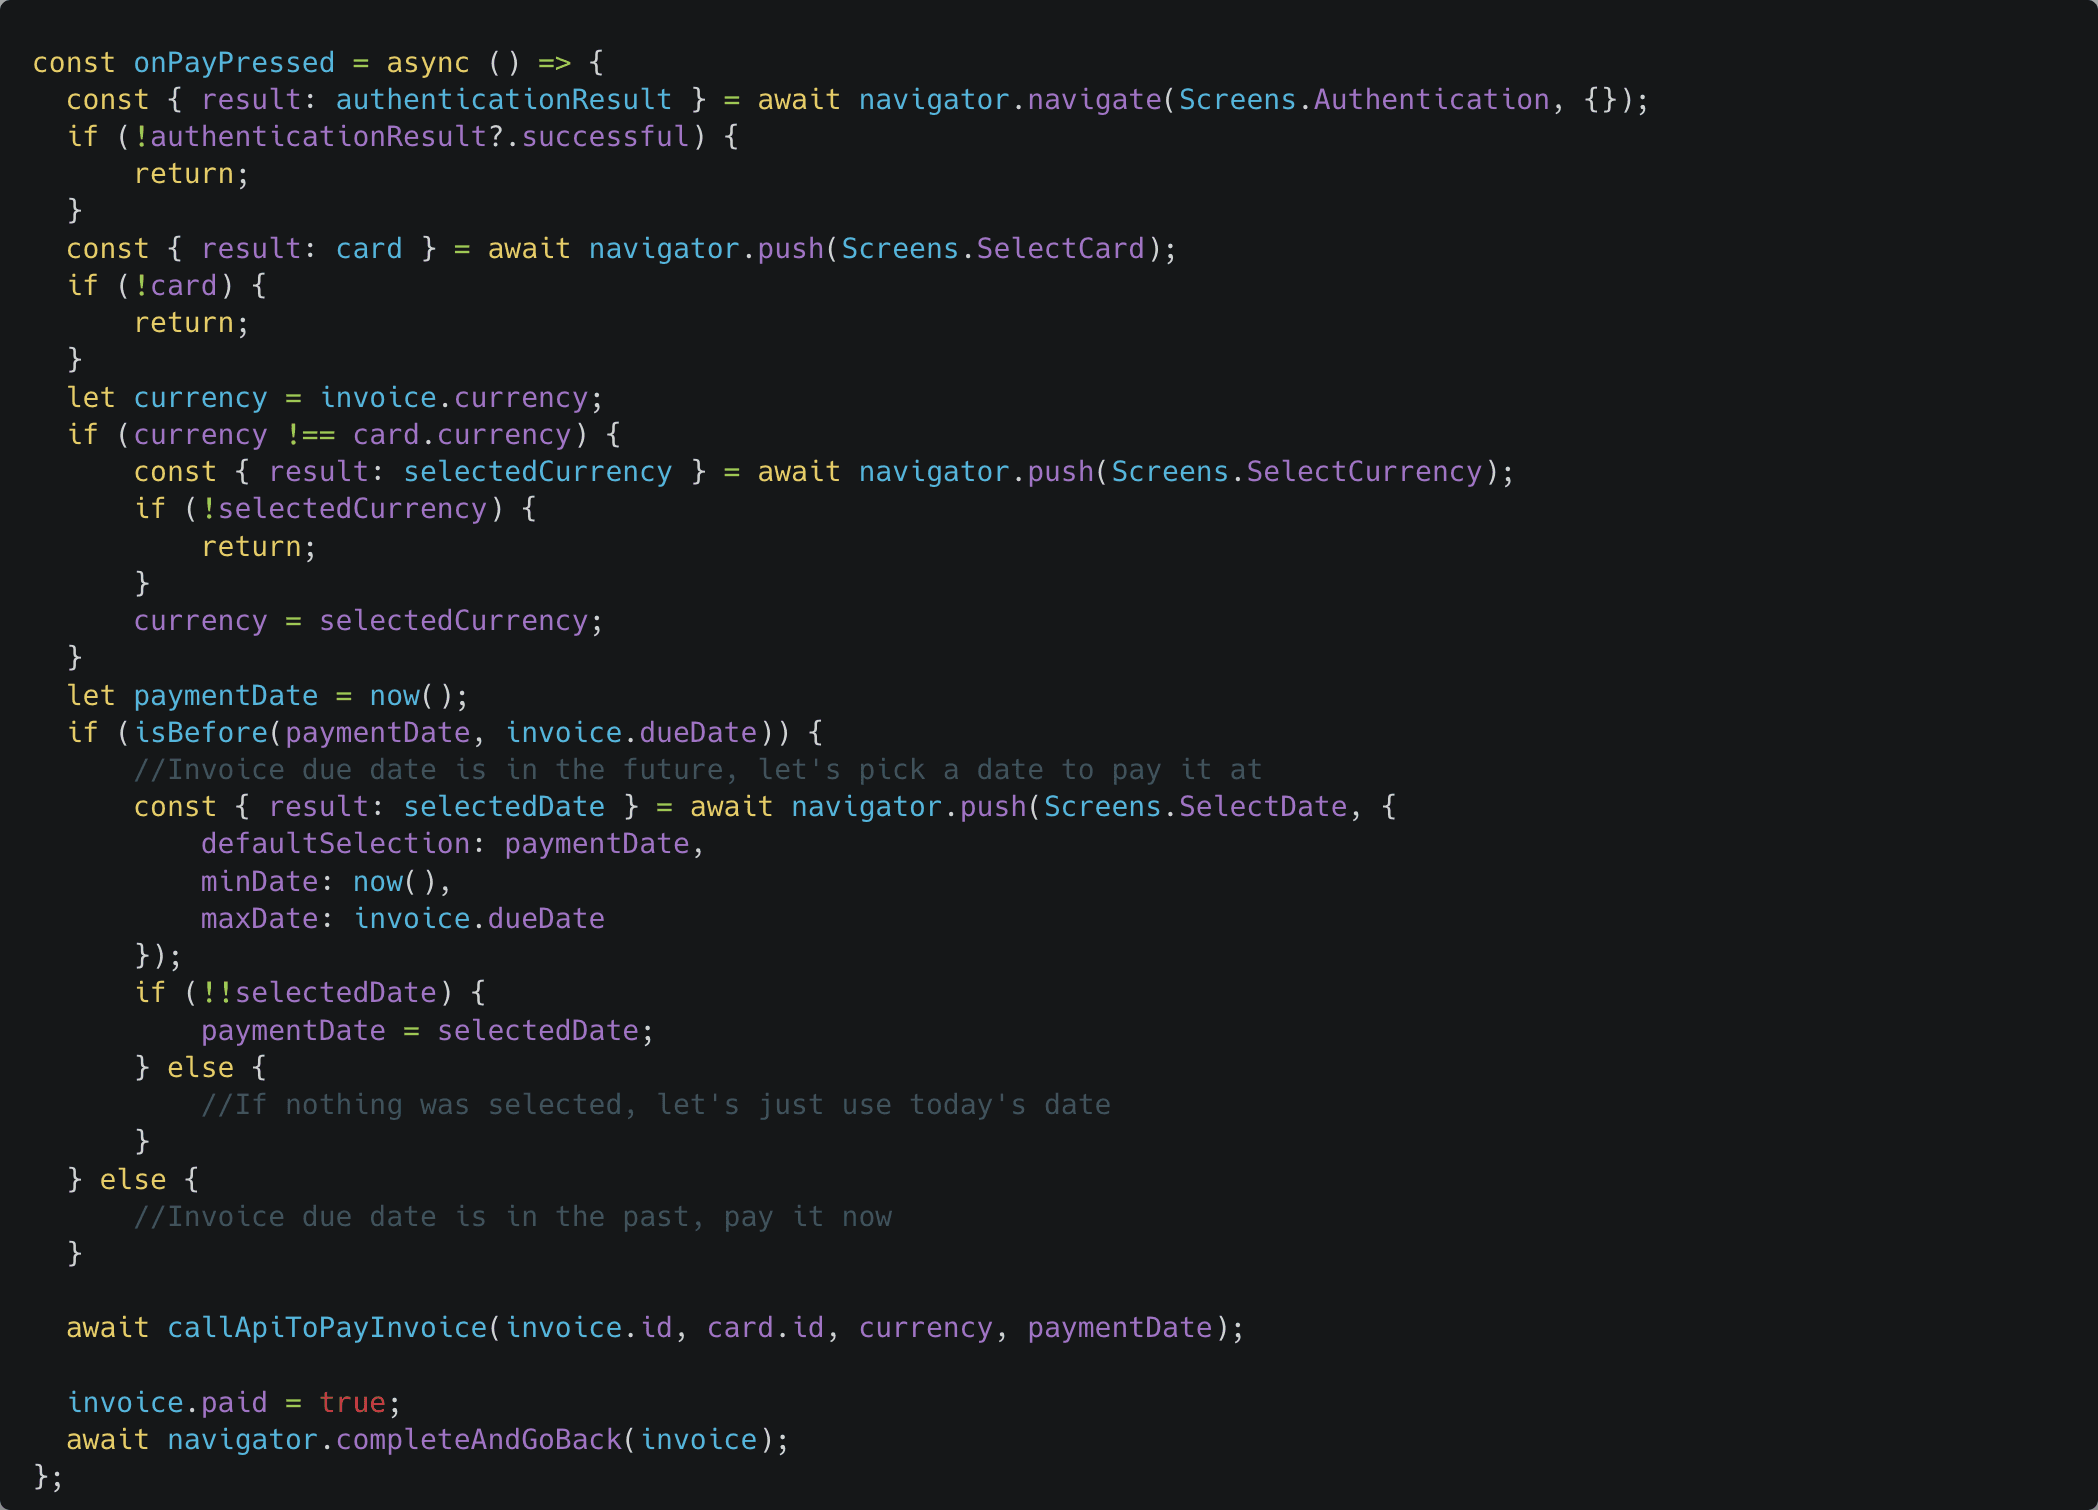
This is so much cleaner! This groups all logic in one place, easily handles conditional logic, and maintains context between flow steps without needing a half-finished action hanging in memory. Each screen can focus on its core functionality, adhering to the single responsibility principle.
Time to Make the Magic Happen!
Whipping Up a Tasty Remedy with asynchronous gastronomy
Our solution will involve:
Creating a Promise where navigation occurs in Screen A
Navigate to the new screen while finding a way to pass the Promise's resolve function to this screen.
Having Screen B call the resolve function with the relevant data once its purpose is fulfilled
However, we face several challenges:
Juggling the resolve function and data between components at breakneck speed might just land us the title of "Least-Liked Developer" at the office. So we need to tackle this issue to keep our colleagues smiling.
React Navigation strongly discourages passing non-serializable objects in navigation parameters. This is mainly because it can break other functionality such as state persistence, deep linking etc. Read more about it here. So we need to solve how to pass our resolve function which is not serializable.
Given the significant changes to the navigation method, it might be more suitable to develop a custom TypeScript solution that aligns better with our system, rather than attempting to force the existing TypeScript system from React Navigation to fit our needs.
To avoid being shunned at the office, we'll wrap the standard useNavigation hook from React Navigation in our own version, useAsyncNavigation. This will allow us to apply our custom logic around it and take care of passing the resolve function and data around, tackling challenge 1.
We can address challenge 2 by introducing a context, AsyncNavigationContext, which wraps our entire app and provides an in-memory cache for resolve functions. Each function would get a generated unique string id and this id can then be passed from screen A to screen B to link them up without breaking the serializable constraint.
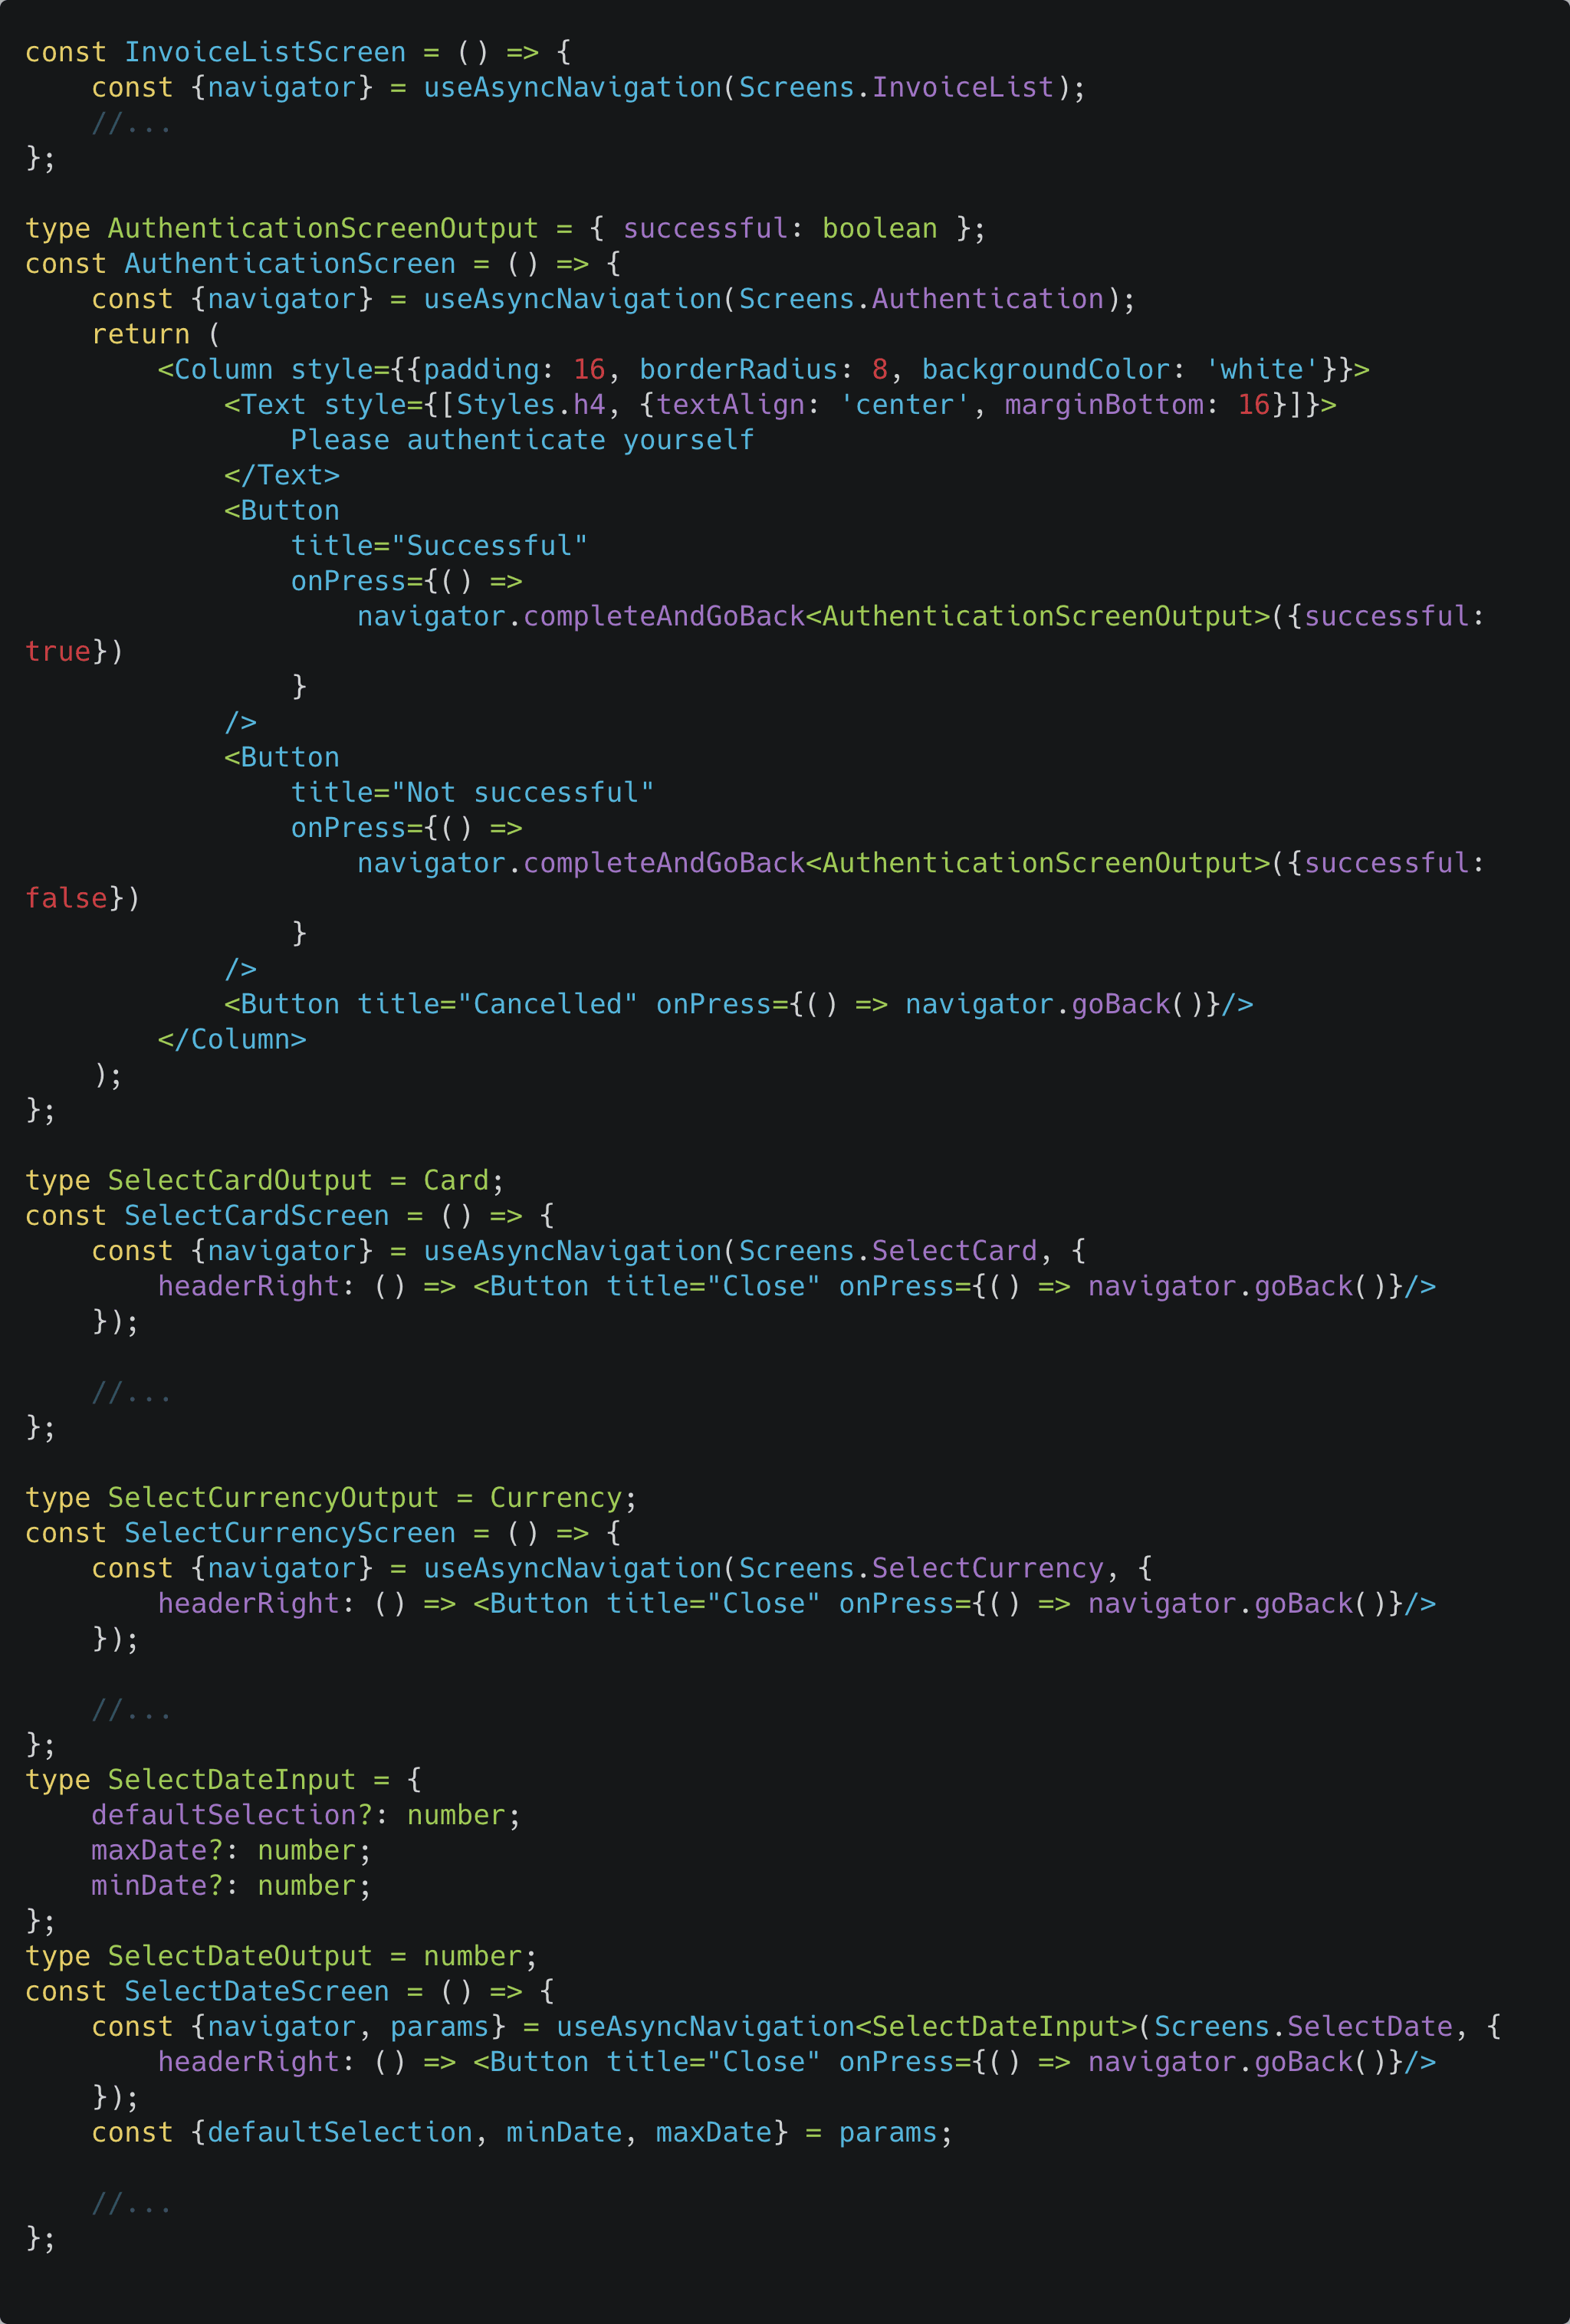
Should this id be missing or point to a function not found in the in-memory cache, the screen would be unable to pass data to a previous screen. This almost exclusively impacts screens that are general to the app as a whole, have very contained logic, and only make sense as part of a flow, like the authentication popup or card/currency/date selector screens. Screens like the InvoiceList or InvoiceDetail should not be affected if their resolve functions cannot be found.
To address state persistence, we can simply avoid updating the saved navigation state if one of these screens is the currently active screen.
As for deep links, we have two scenarios to consider:
If the app is opened via a deep link, the function id will be empty, which is fine since there should be no screen to notify as the app was opened directly to this screen.
If the app is already open and a deep-link is clicked, then the app should show the correct screen. This screen, however, was not opened from another screen, so there is no need to notify a previous screen.
Challenge 3 is a big enough topic for its own blog post, so we'll cover that soon. Stay tuned! For now, we've provided two versions of the code in the example repo: AsyncNavigationWithoutTypes.tsx and AsyncNavigation.tsx. The rest of this blog will reference AsyncNavigationWithoutTypes.tsx.
The Secret Sauce: Unraveling the Intricacies of Our Marvelous Concoction
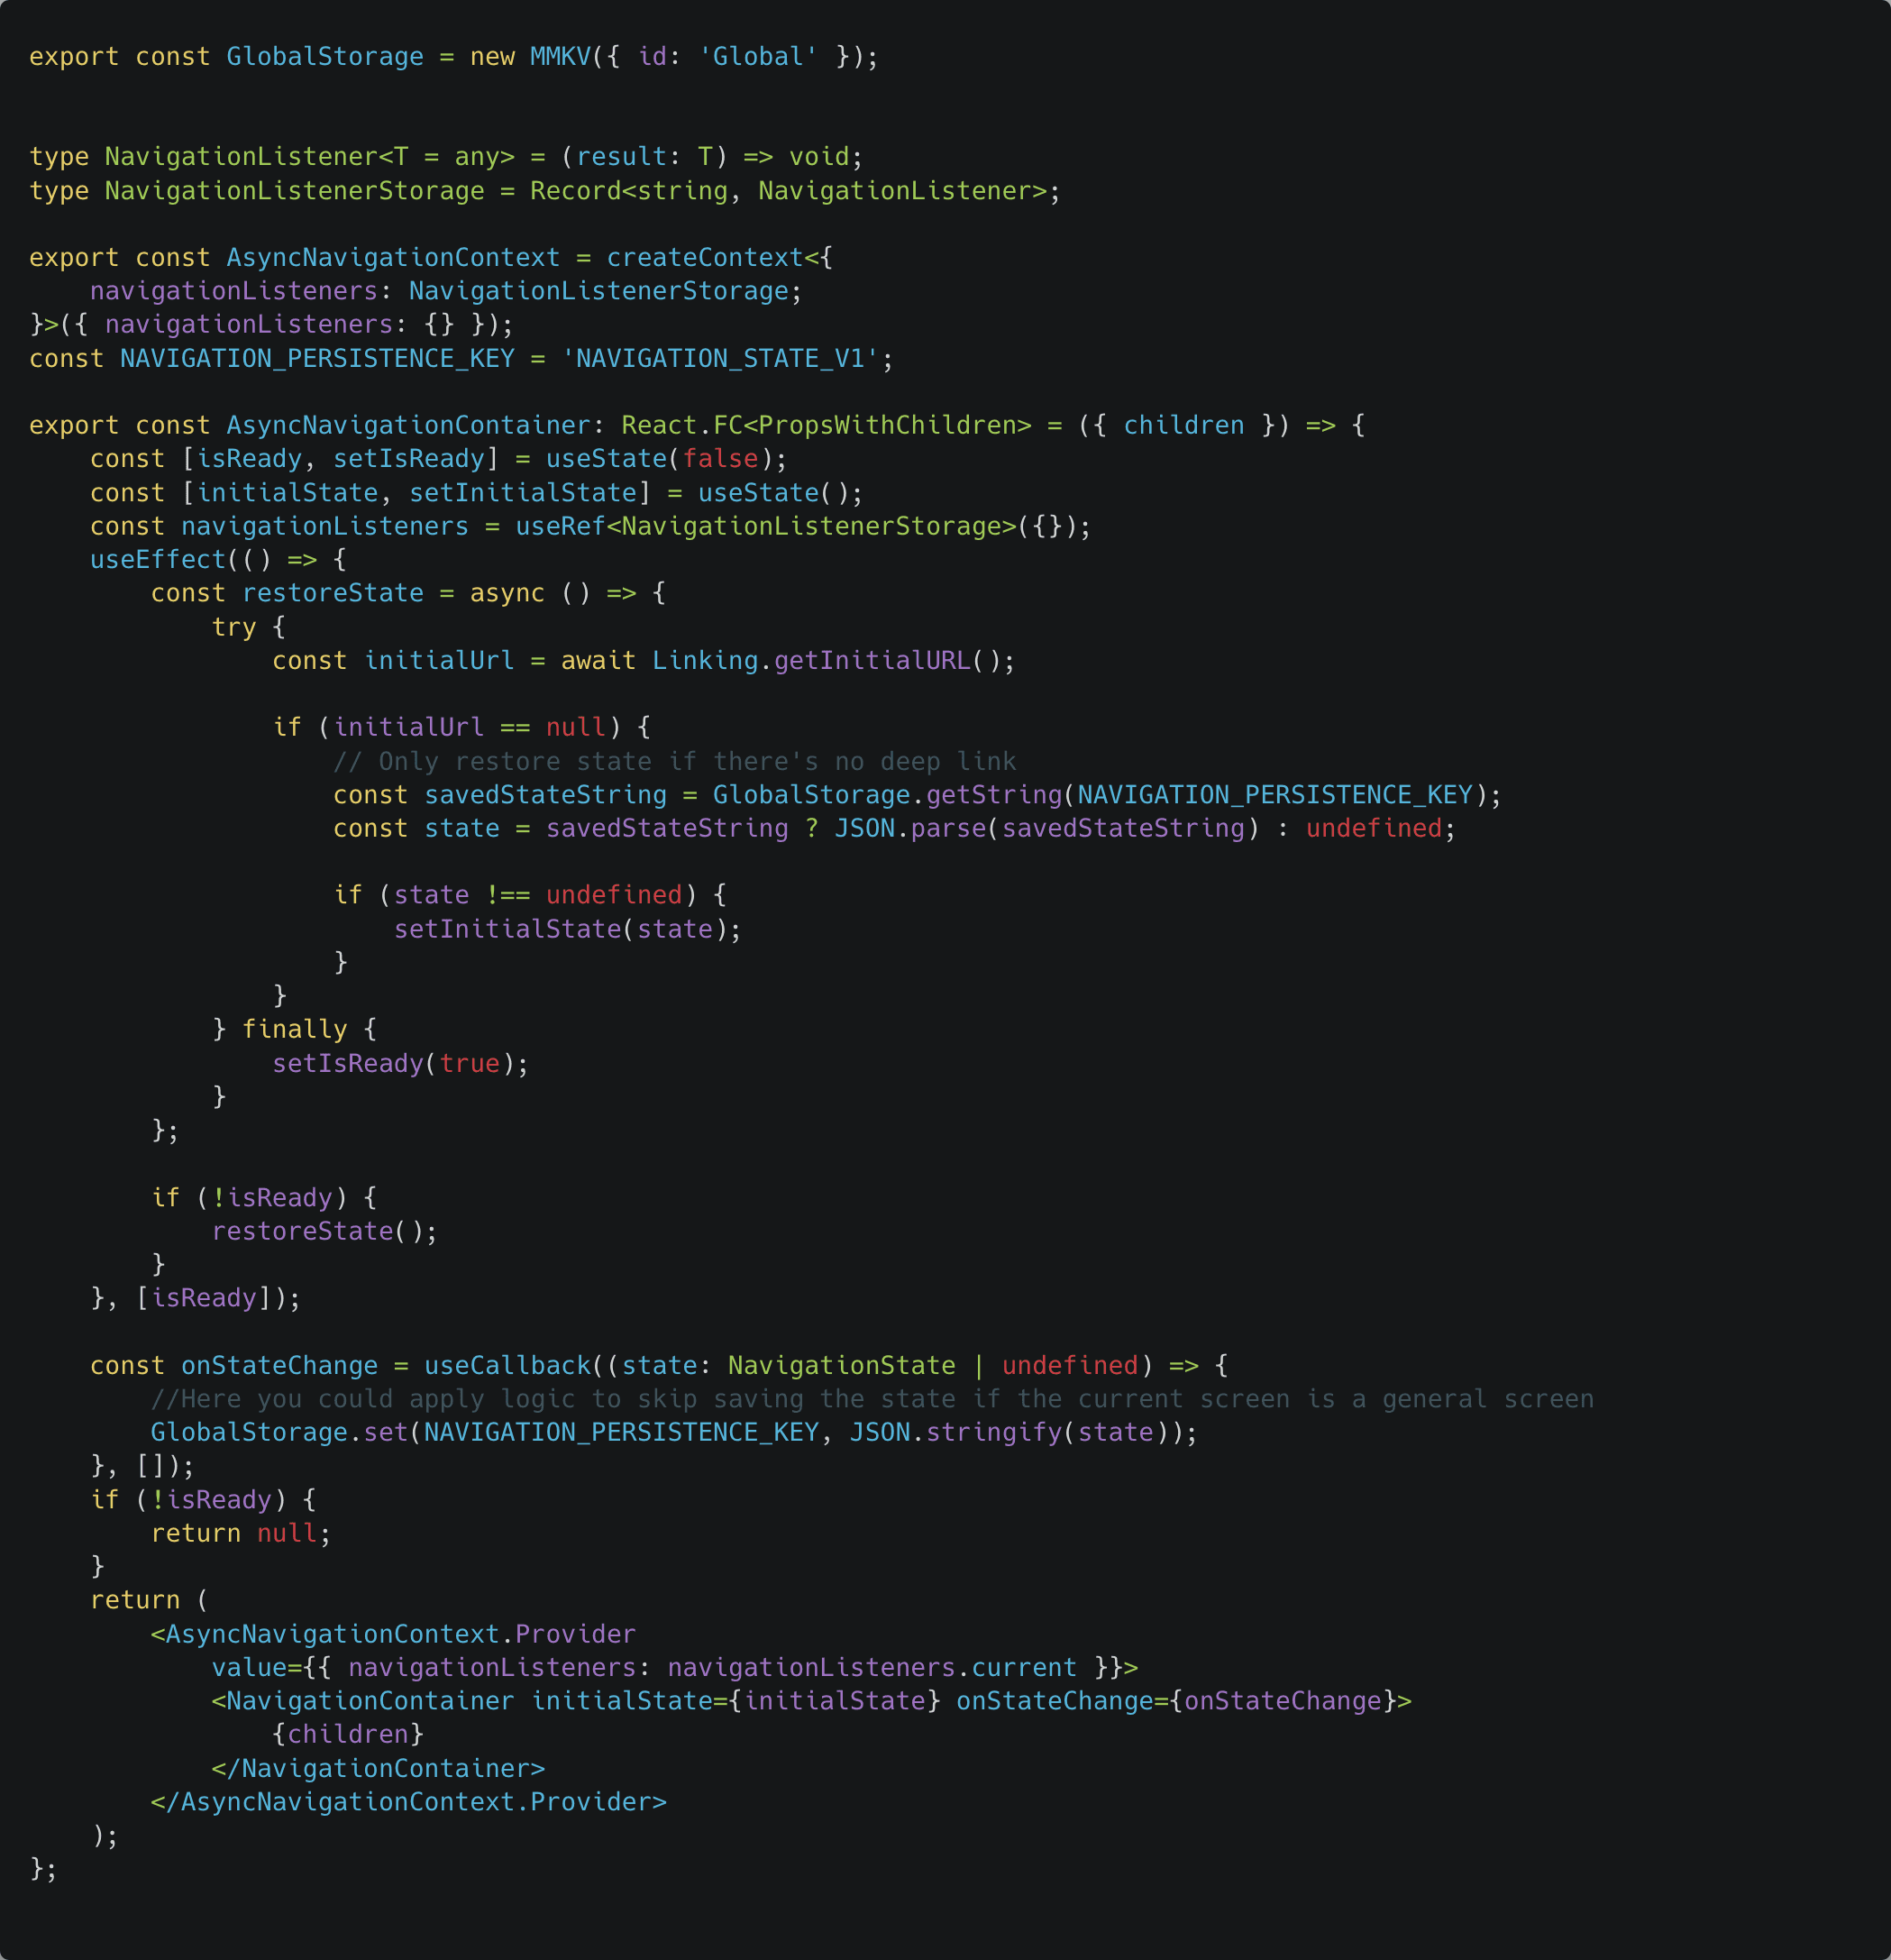
We begin by whipping up our context. Since React navigation demands that we envelop the whole app in a NavigationContainer, we're going to mimic that approach and create our own AsyncNavigationContainer which serves a few purposes:
Supplies the AsyncNavigationContext, housing our resolve function cache.
Implements state persistence across the app with an option to filter out screens that shouldn't be stored. We're using the fantastic react-native-mmkv library to store and fetch the state synchronously.
Wraps the app in React Navigation’s NavigationContainer
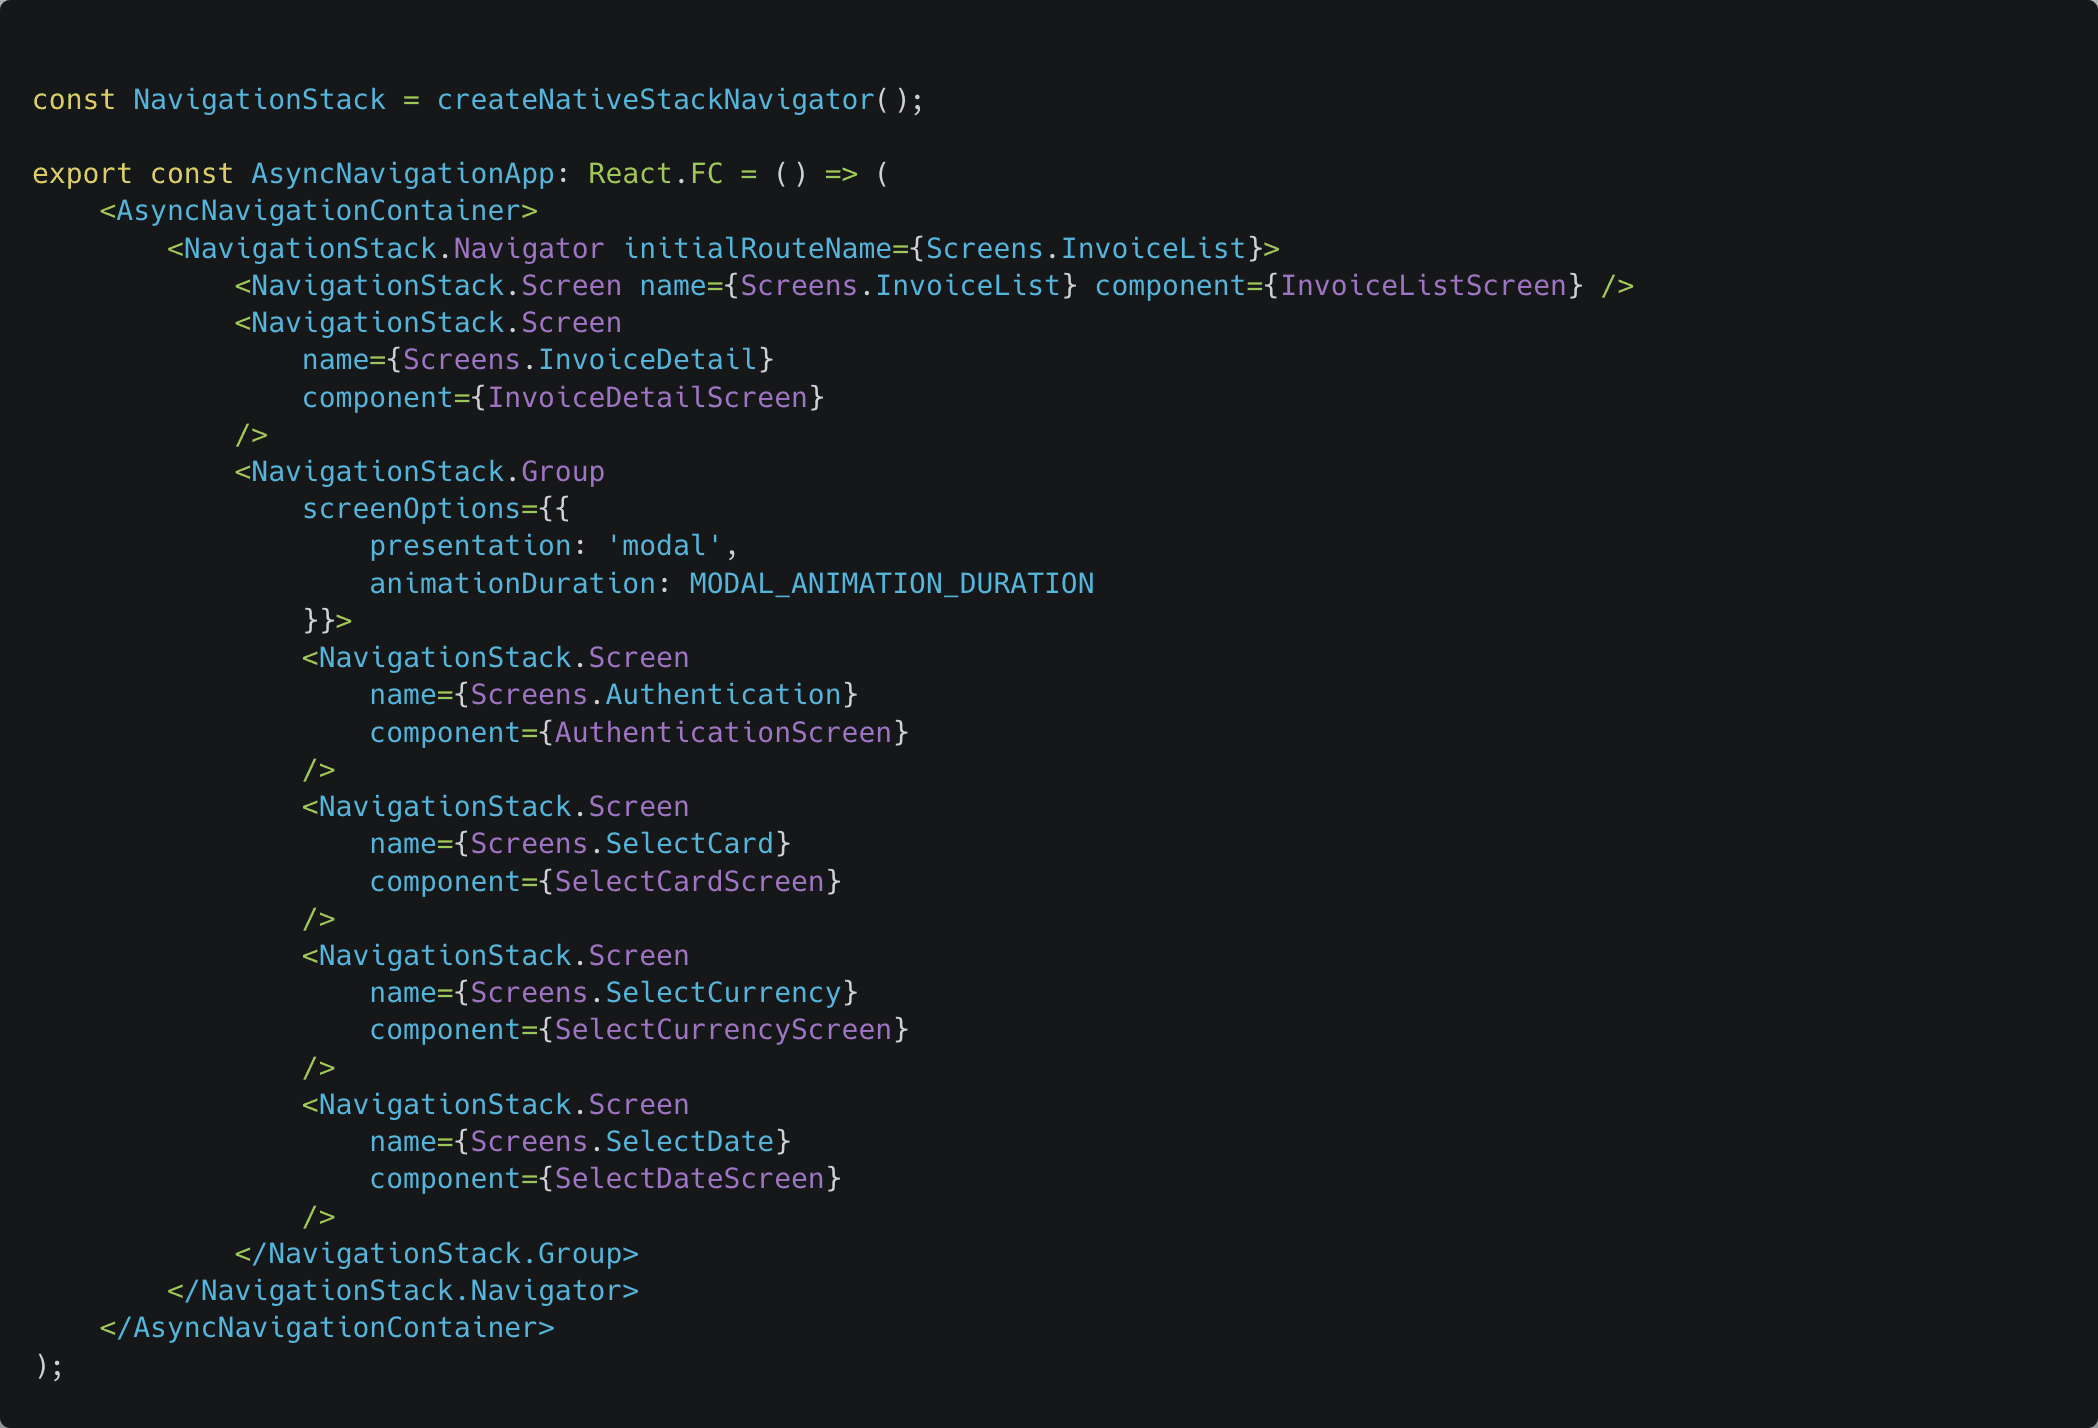
And our main App file:
With that out of the way, our next mission is to concoct the main course, constructing our wrapper around React Navigation.
We will need to wrap the navigation methods in our own implementations. We will tackle this by creating a class, Navigator, which performs all the wrapping wizardry while also presenting a delightful interface for developers.
We start by defining our type for the result of a screen. If the user presses back we won’t have any data to return, otherwise it should return something so we create a union type that enforces this.

The constructor for the Navigator class takes in the current screen, the navigation object, and the route from React Navigation, as well as the cache.
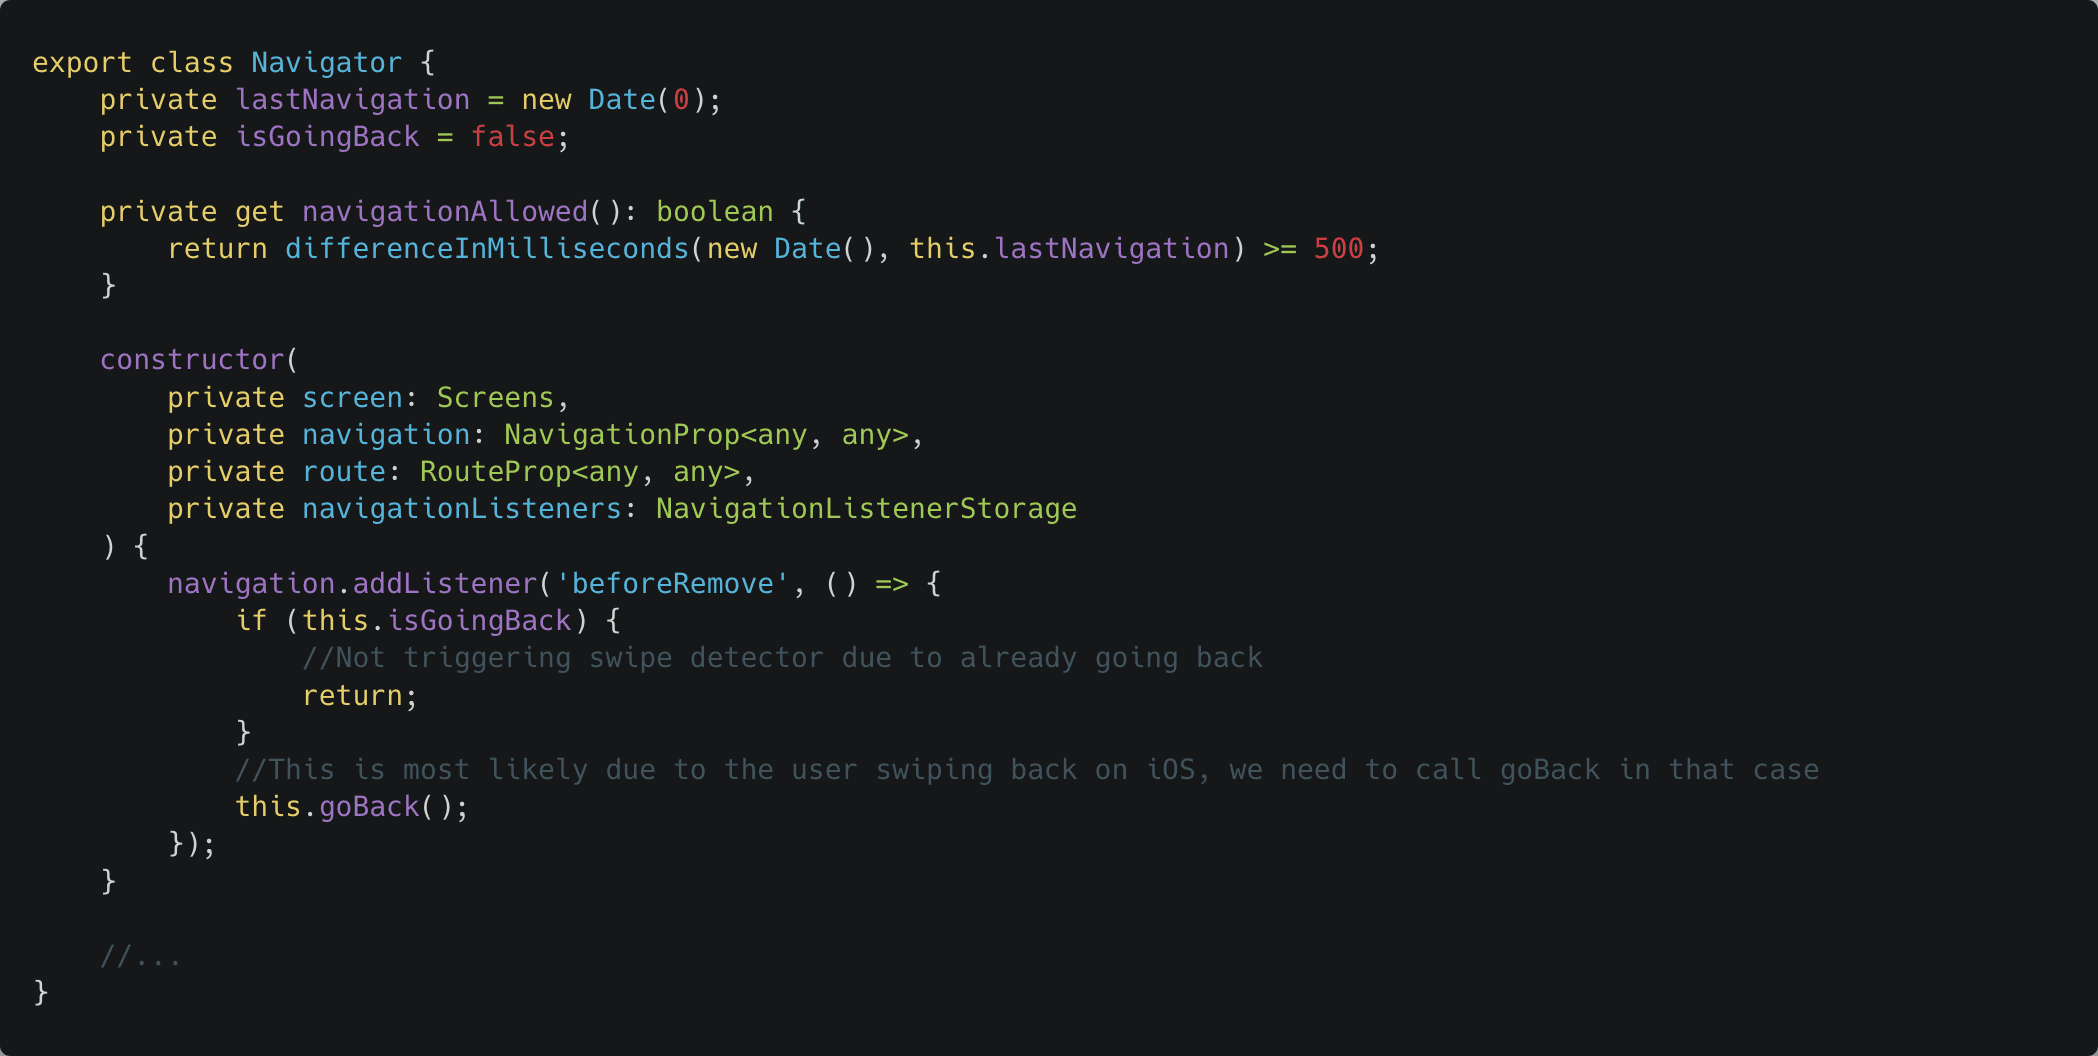
The listener for ‘beforeRemove’ is to correctly handle the swipe back behaviour on iOS. If the user swipes back, we need to cancel the current screen correctly by calling goBack.
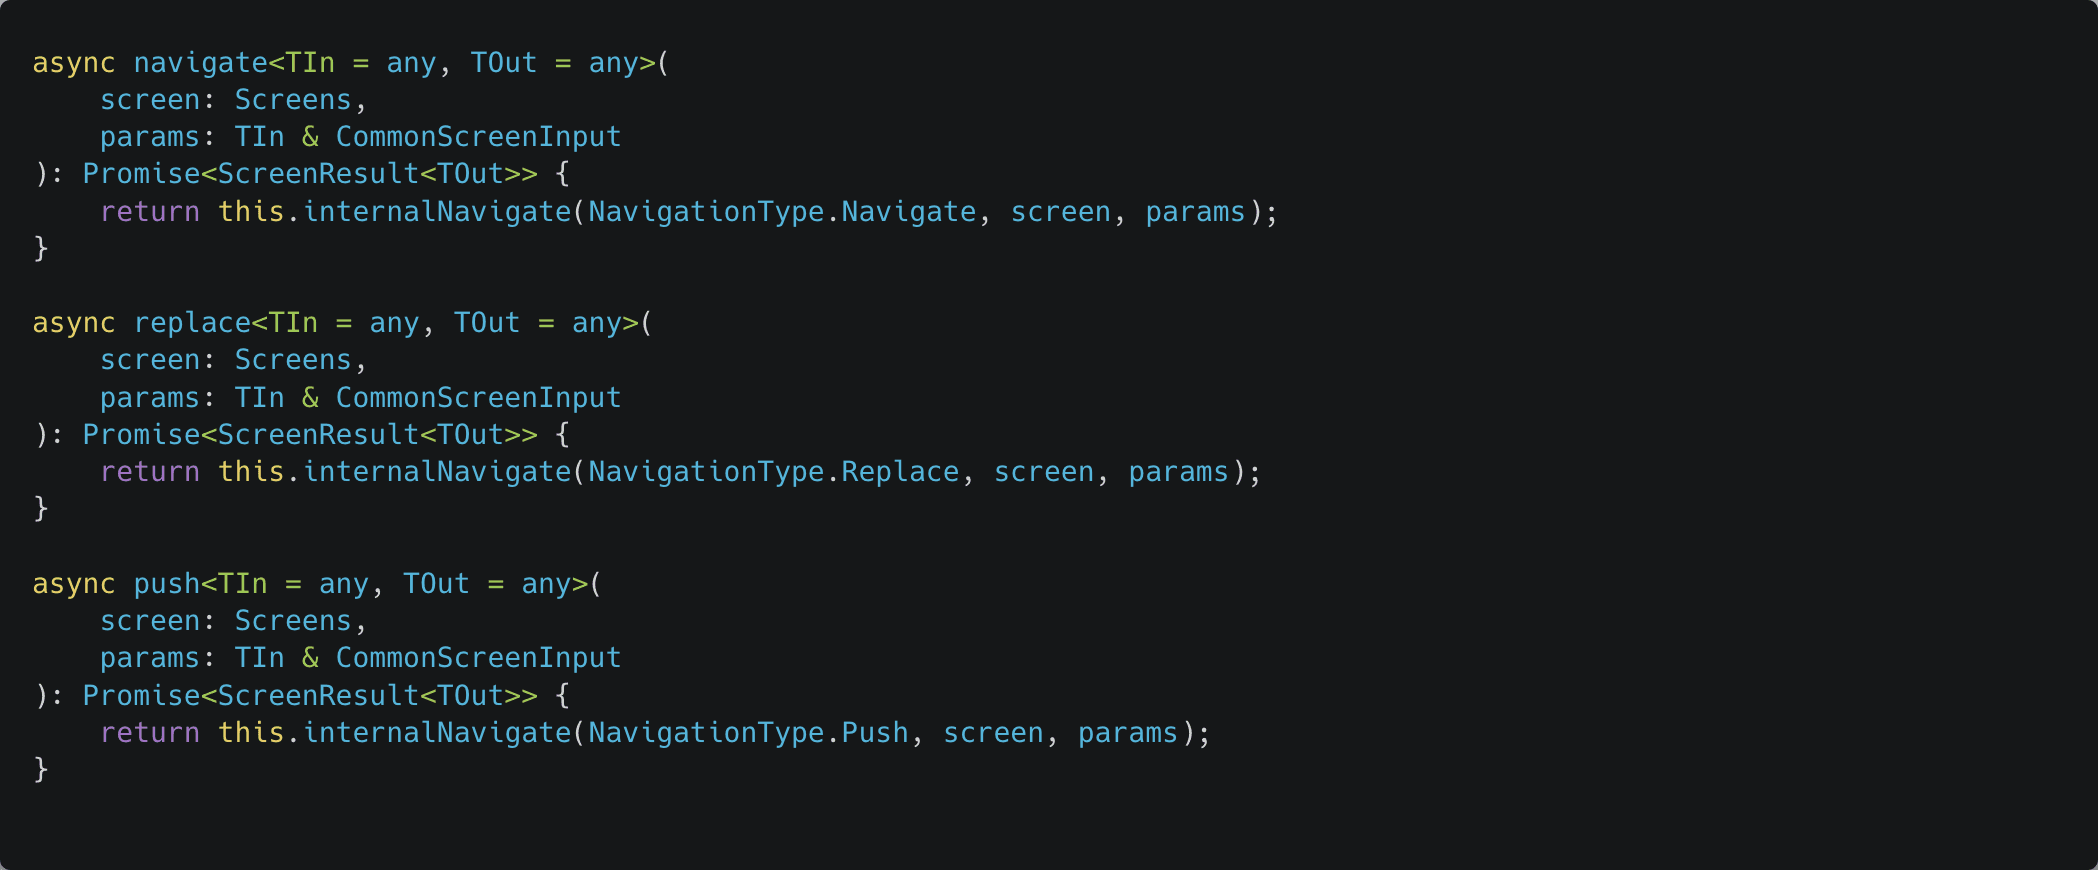
There are three different navigation types we want to support: navigate, replace and push. In all instances, our asynchronous implementation is identical, and the only difference is the underlying navigation method. Hence we can make this DRY and have a central internalNavigate that manages the wrapping logic and then calls the appropriate navigation method.
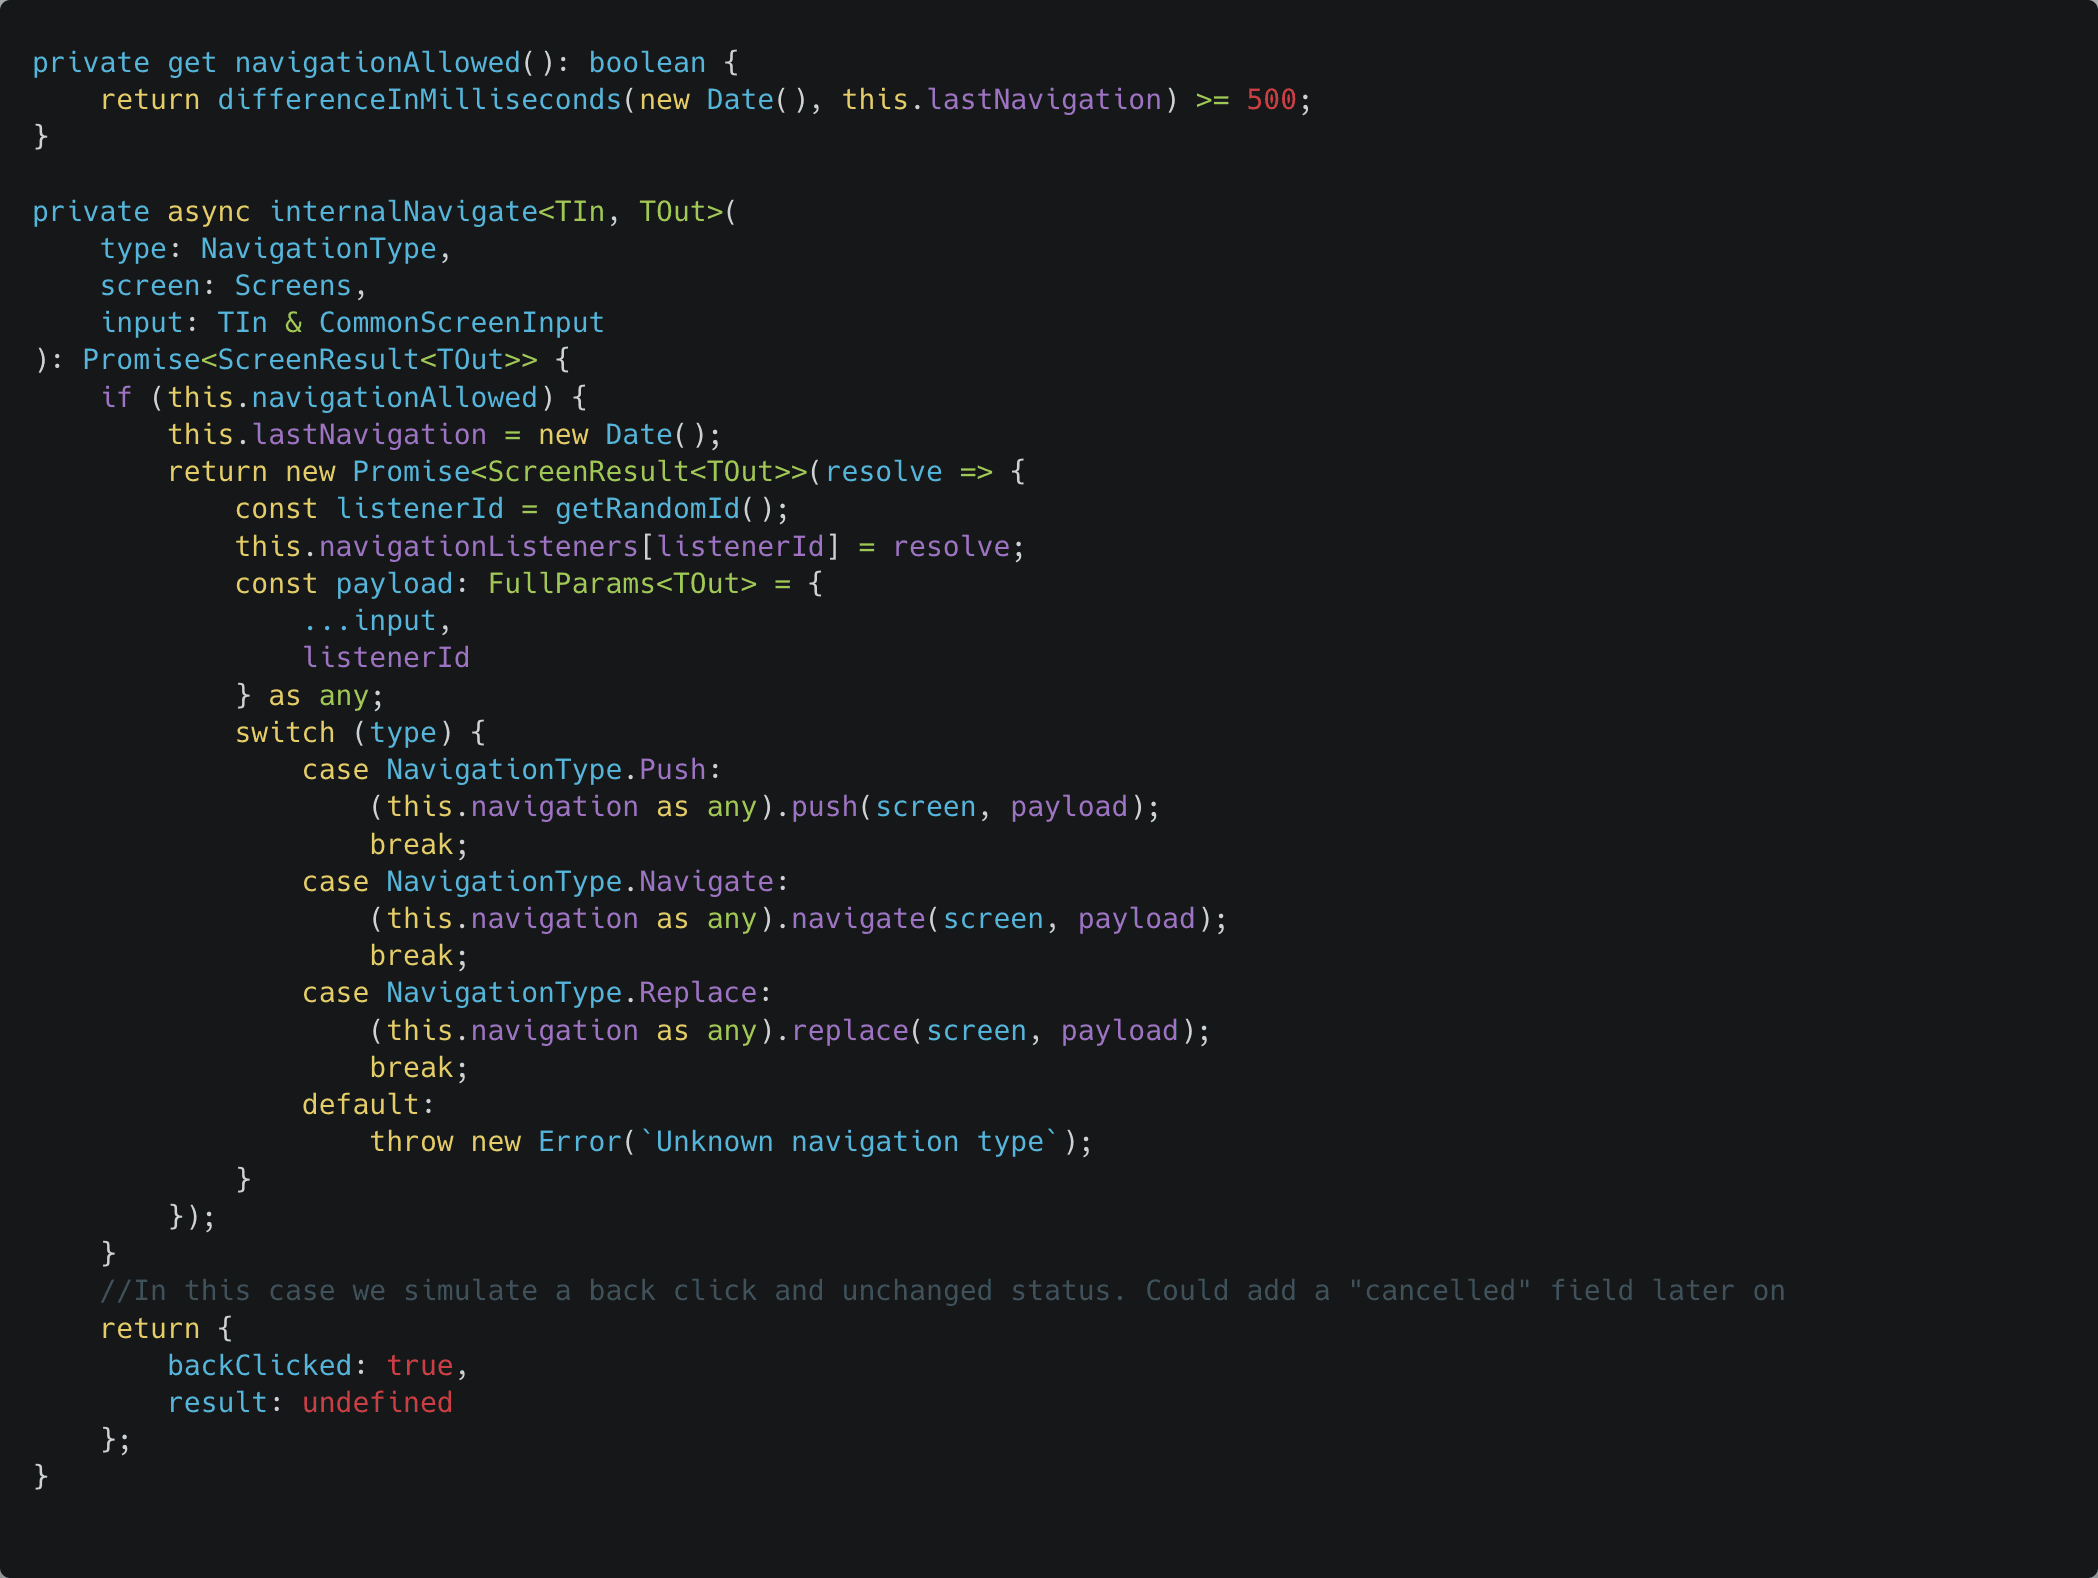
You might be curious about what the navigationAllowed and lastNavigation are up to. We quickly discovered that users have this pesky habit of sometimes pressing buttons multiple times in rapid succession. If said button pushes a screen, this can lead to multiple instances of the same screen being pushed, which tends to baffle the user. By merely debouncing navigation actions within 500 ms, we managed to effectively squash this bug completely within our app.
The type CommonScreenInput contains data that can be passed to React Navigation to customize the navigation action.

These relate to React Navigation’s rendering of the initial route defined in a navigator. A similar approach could be added to handle passing params to different levels of nested navigators.
Our three navigation methods become thin wrappers on top of this method:
Correspondingly we create an internalGoBack method:

The sleep here accounts for the time required for a modal to animate out. If we don't do this, we end up invoking the resolve function instantly upon starting to close the modal instead of when the modal is fully out of sight, which can lead to subsequent screens being pushed too early. We just need to remember to add this delay as the animationDuration in the screenOptions for the modals.
The isGoingBack is used to track the fact that the user is going back via our internalGoBack, and therefore the ‘beforeRemove’ listener should not trigger since this back navigation was definitely not due to an iOS back swipe.
We create two wrapping functions, one for completing the screen and one for going back/canceling:

This completes our Navigator class so the only thing left is making it accessible through our new hook useAsyncNavigation.
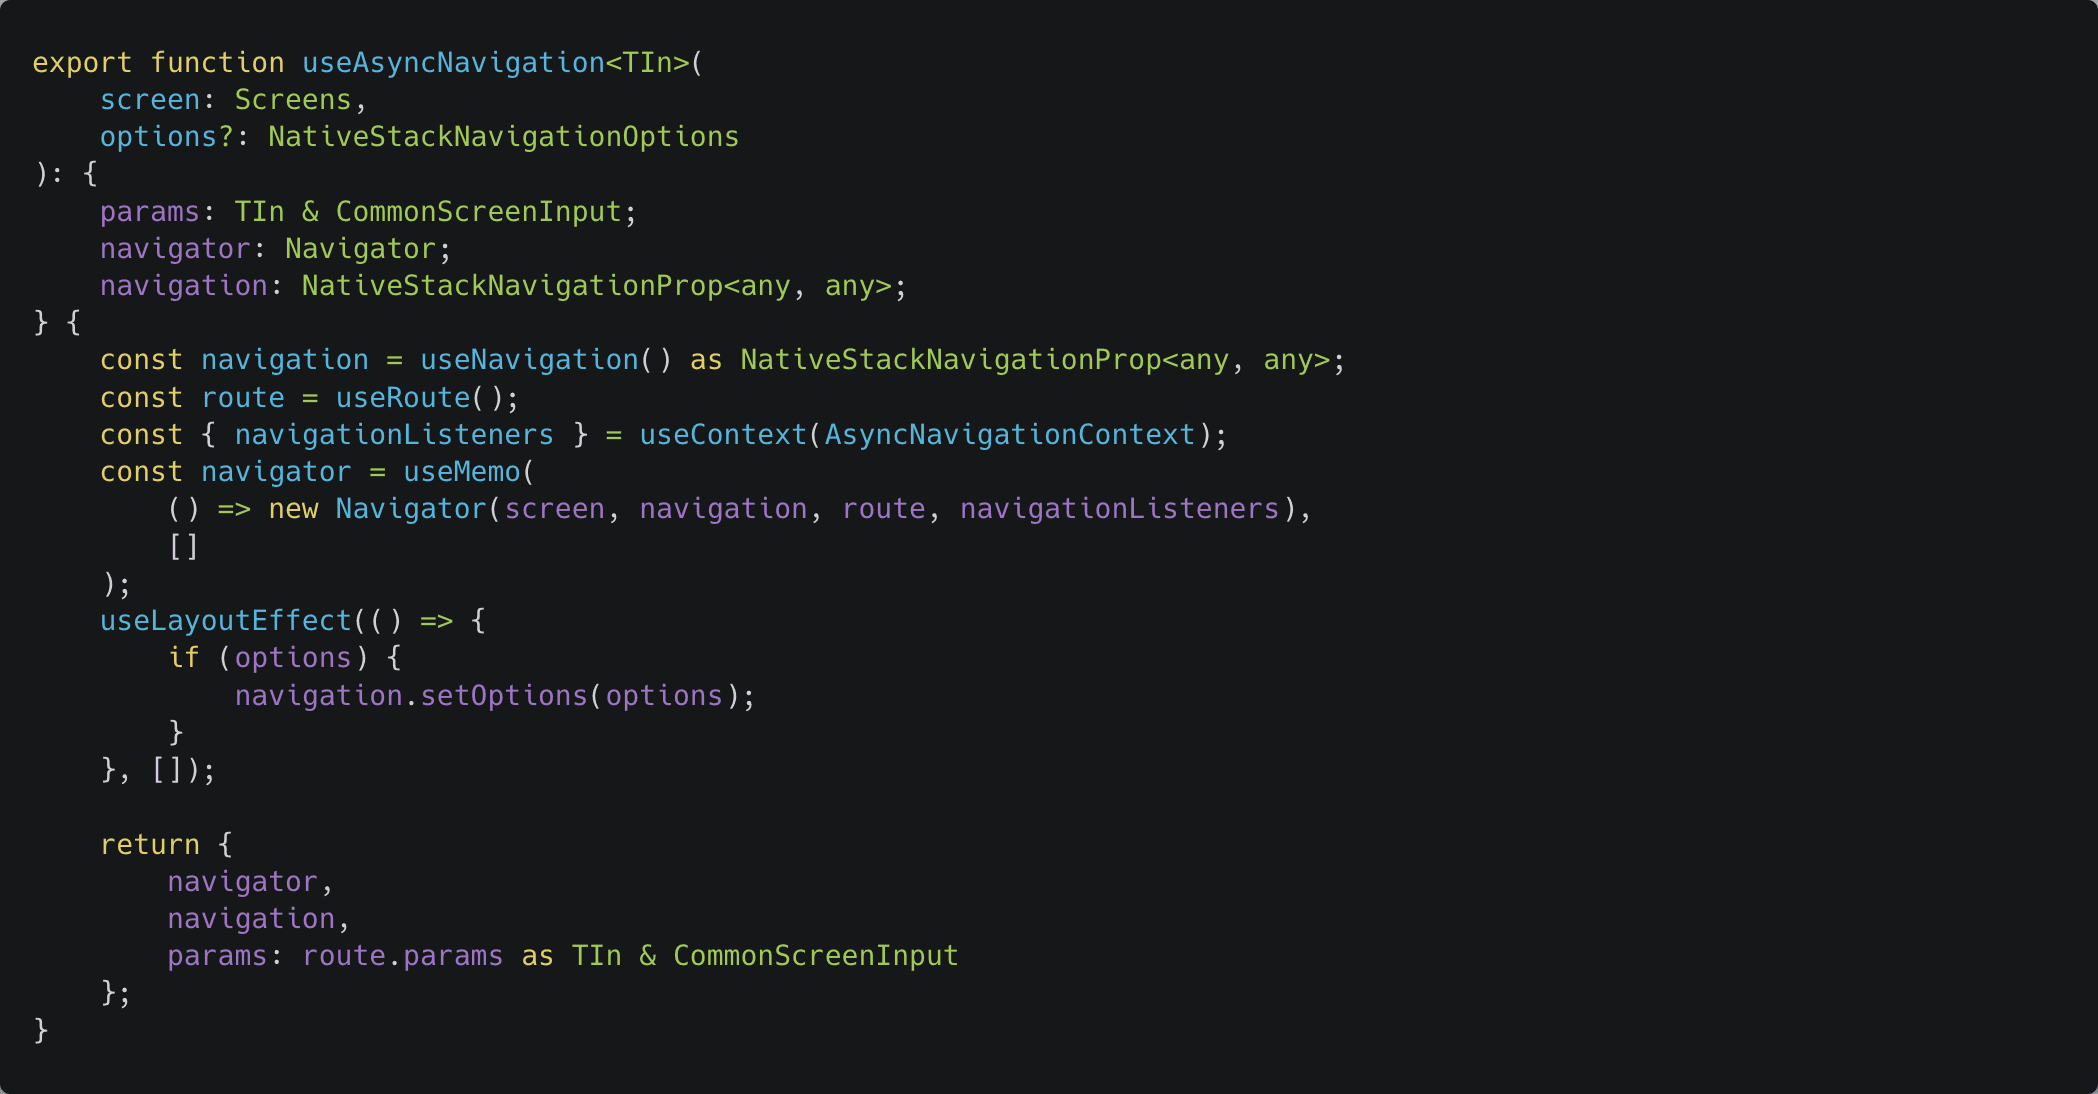
Not much to unpack here. The type TIn is used to type the input this screen received through the route params. We then obtain the navigation and route from React Navigation, the resolve function cache from the context, and construct our Navigator instance. It's vital to memoize it since we don't want multiple navigators interfering with one another.
We soon realized that screens often need to tweak their screenOptions using the setOptions method on the navigation object. Instead of having to get the navigation object from the hook and then applying the options we could streamline the developer experience by allowing them to pass the modified options into the hook directly. An example of this can be seen in the SelectDate modal:
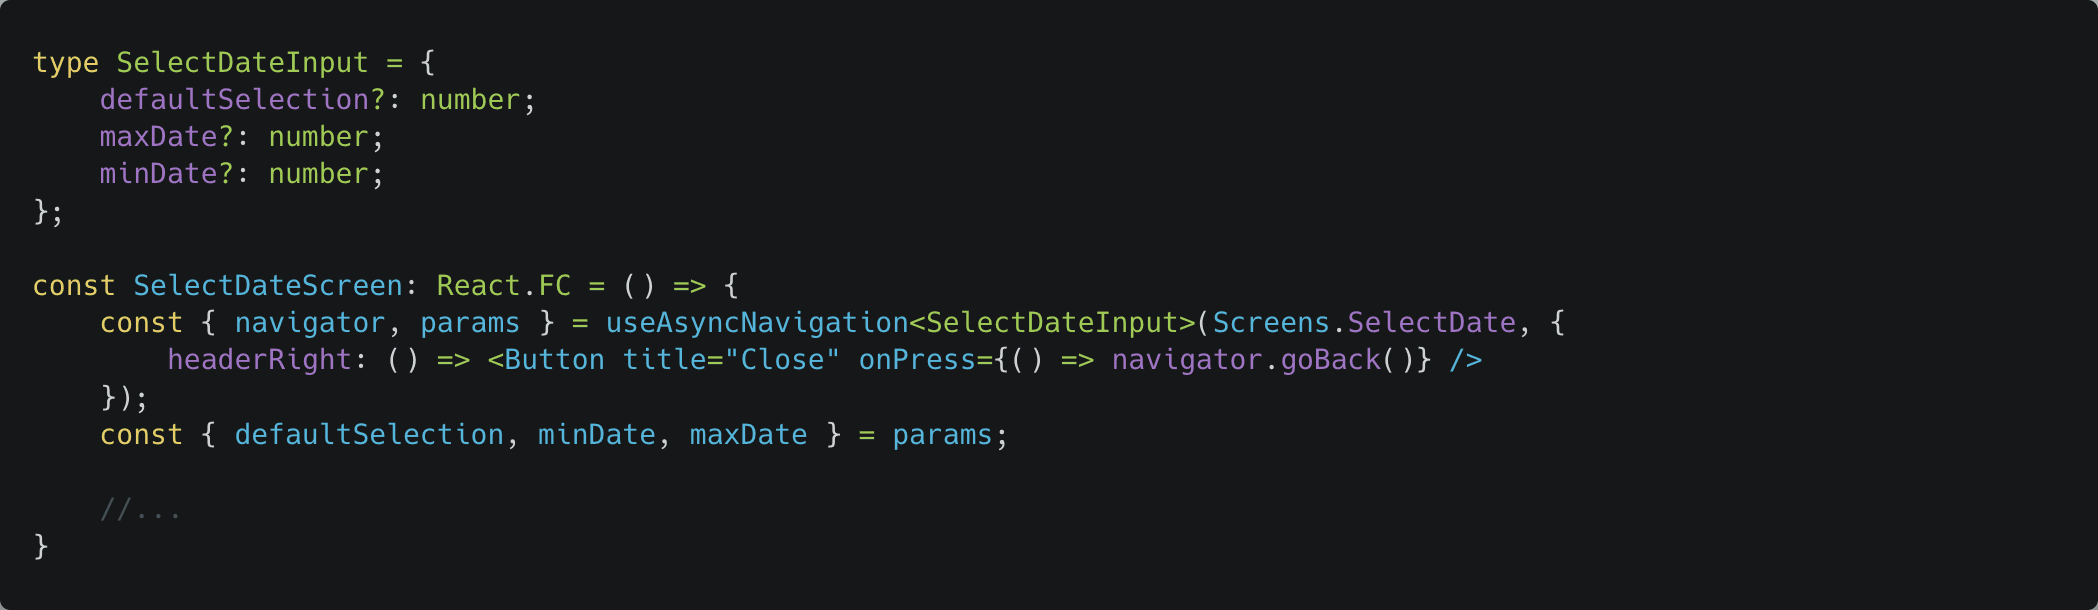
Here, we're adding a Close button on the right-hand side of the header, but the approach would be similar if we wanted to modify the header title, background, or some other feature entirely.
Savouring the fruit of our labour
So, what have we harvested from all this toil? Well, our magical Navigator class allows us to accomplish what we set out to solve, namely:
The pièce de résistance can be witnessed in the InvoiceDetail screen, where the screens involved in the flow can now be seamlessly chained together.
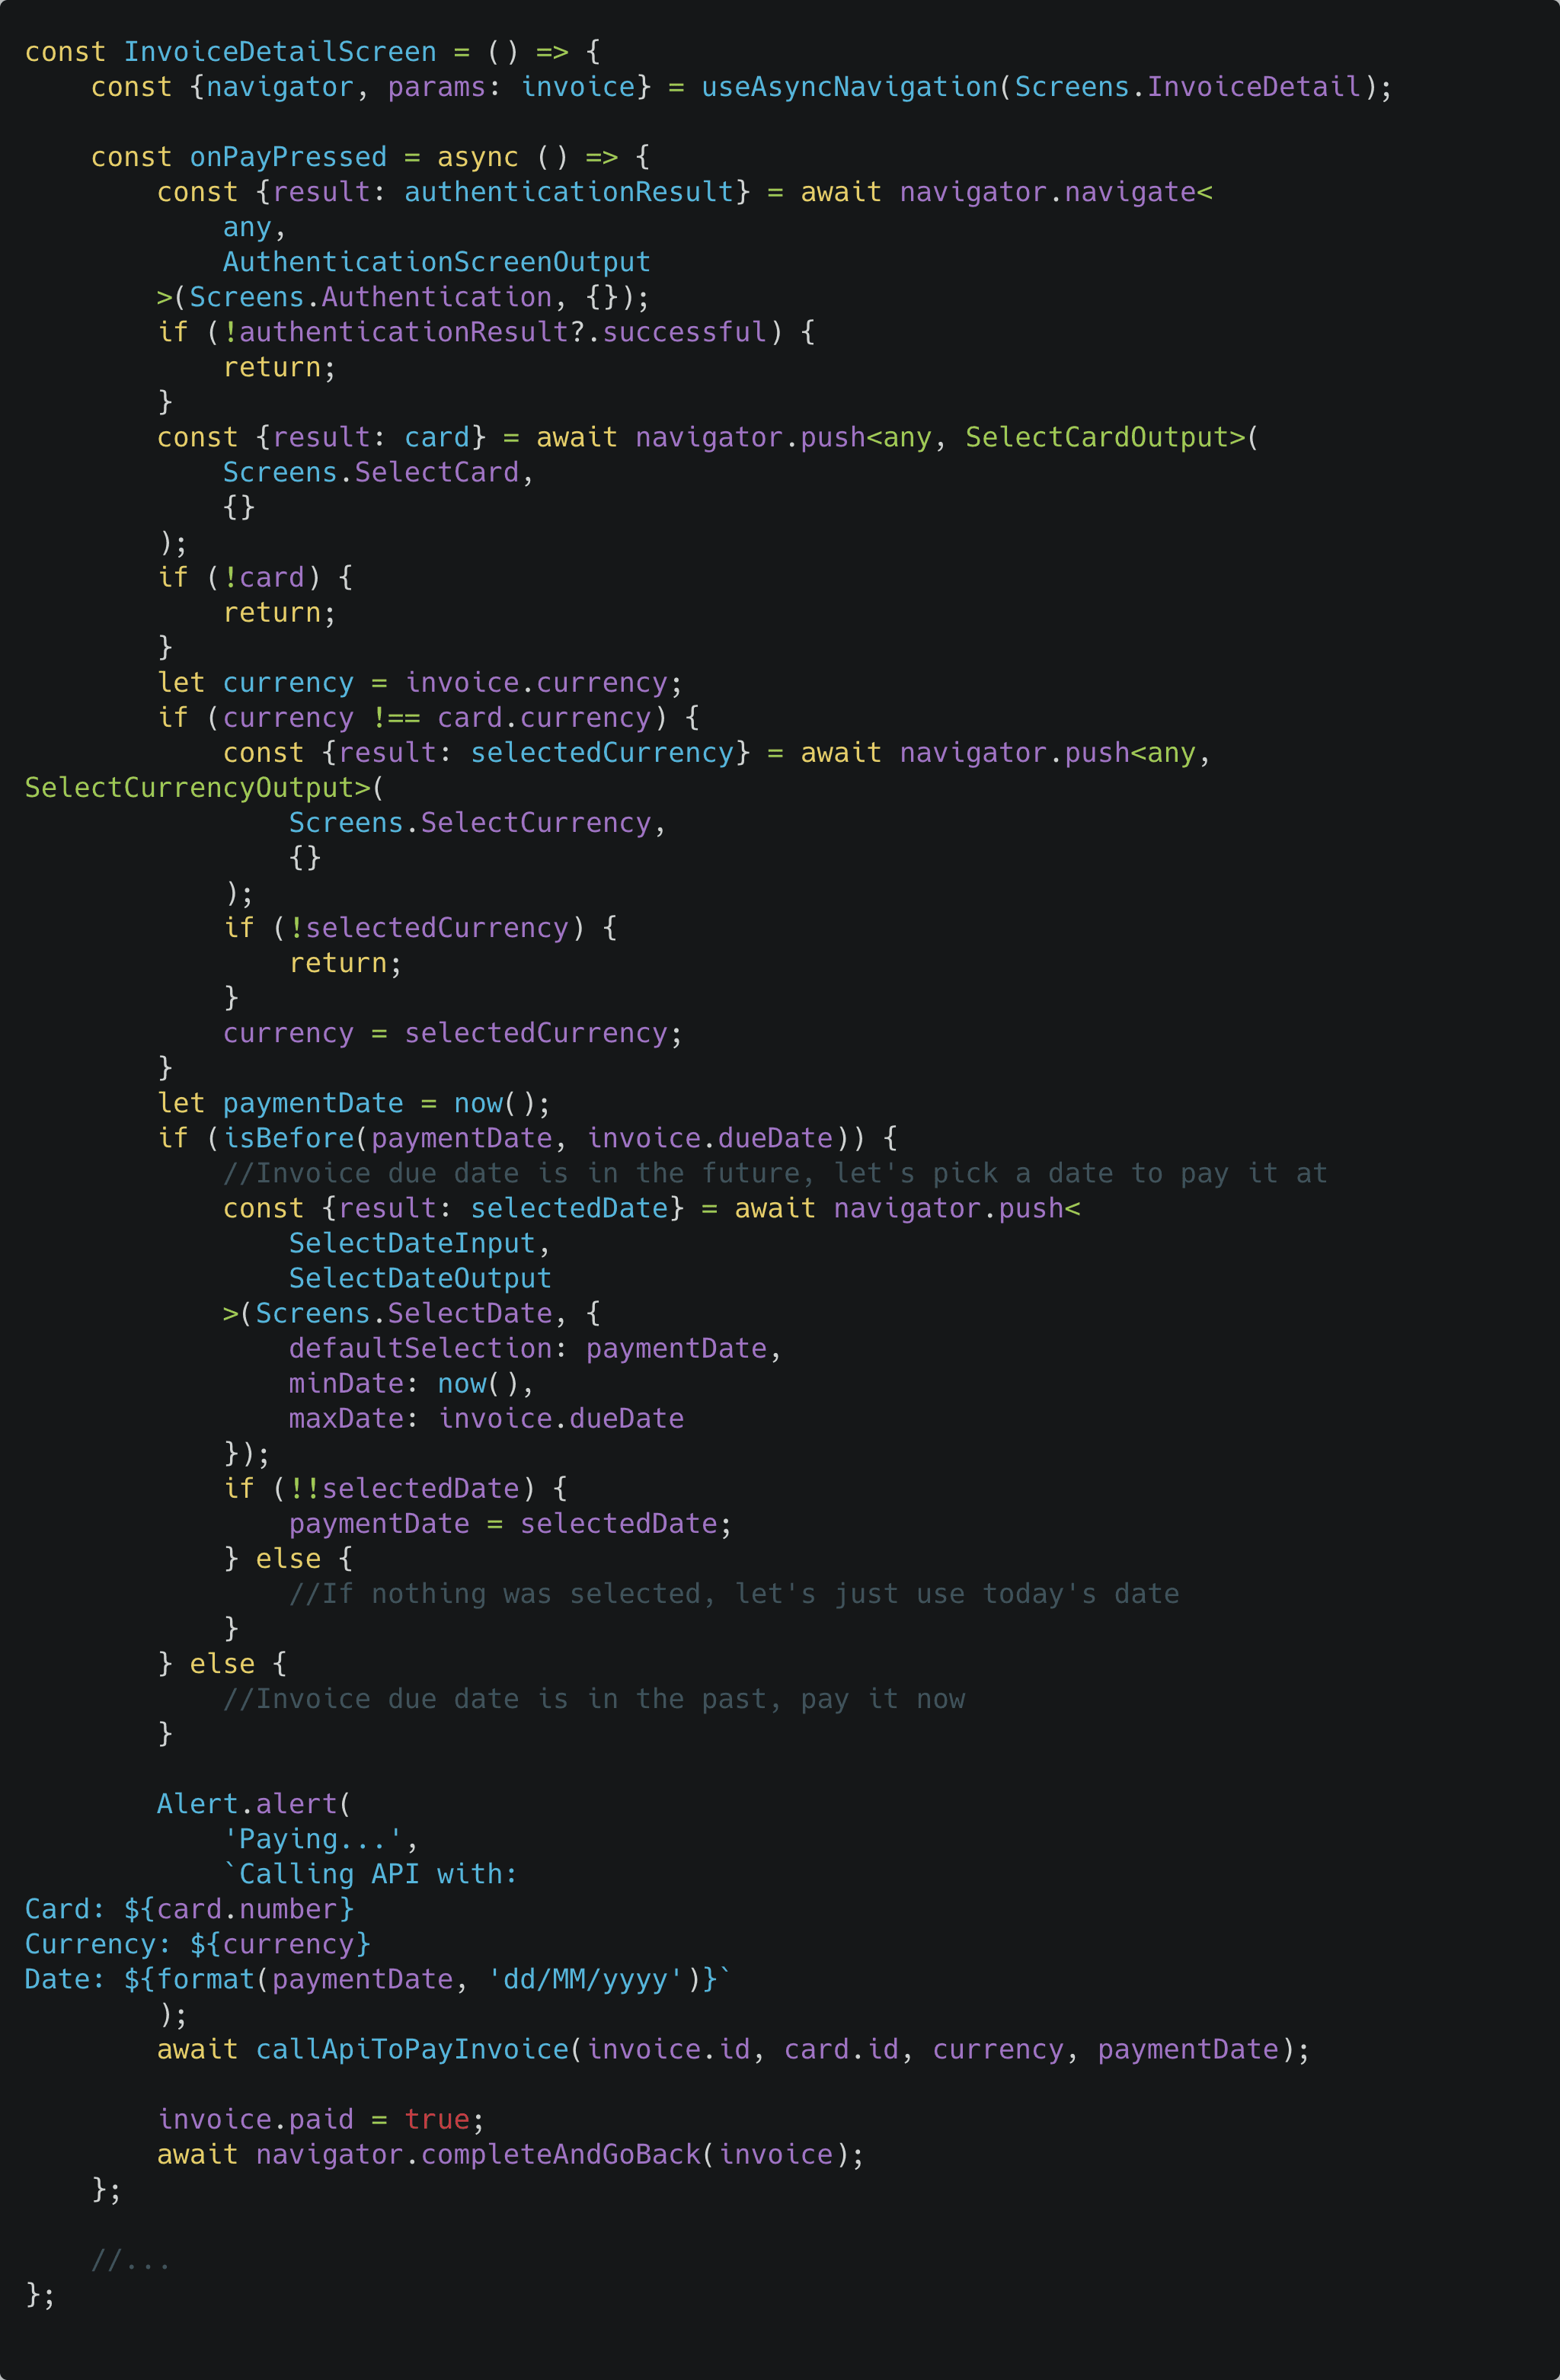
A comparison between the code before and after (disregarding common code and imports):
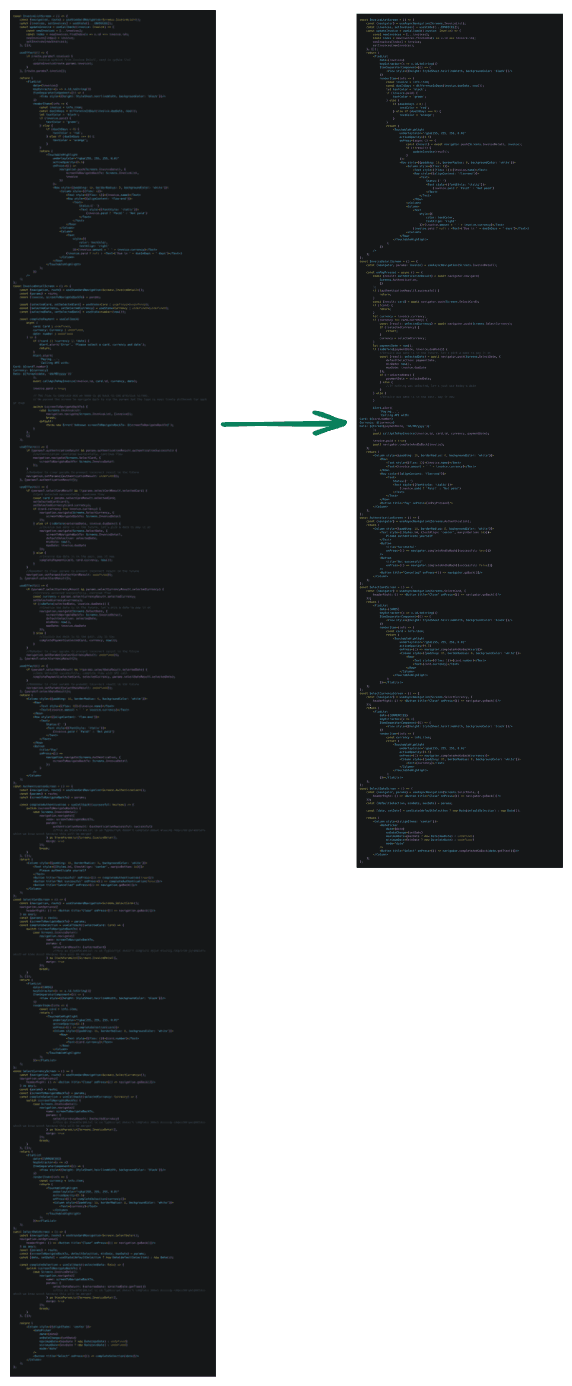
The line count plummeted nearly 40%, from 370 to 230, and the code is now more comprehensible, versatile, and organized into logical segments. In a real app, as more screens are added, the complexities of the navigational code will only escalate, and the individual useEffect handlers within each screen would drift even further from the click handlers they're triggered from, making the flow increasingly difficult to decipher.
Wrapping It Up
In this article, we have successfully demonstrated a novel asynchronous approach to navigation in React Native using Promises, which simplifies the code and greatly enhances the developer experience. By implementing an asynchronous navigation flow, we've managed to declutter complex code segments, significantly reduce line count, and improve the overall organization and readability of our code.
Our custom navigation solution not only maintains full backward compatibility with React Navigation, but also complements it which enables developers to enjoy the benefits of both systems and choose the most suitable approach for their specific use cases.
Furthermore, our approach adheres to the single responsibility principle, ensuring that each screen remains focused on its core functionality without being unnecessarily coupled to other screens. This results in a more modular and maintainable codebase that is easier to understand, debug, and extend.
By incorporating this asynchronous navigation technique in your React Native projects, you'll be better equipped to manage complex navigation flows and build more robust, scalable, and user-friendly applications. The benefits of this approach will only become more pronounced as your application grows and navigation requirements become increasingly intricate.
Give it a try and experience the difference it can make in your projects, and you'll never want to go back to the old way of handling navigation in React Native.
References
Checkout the full example on GitHub.